
Utopia eBooks User Guide
Introduction
Purpose of this document
This document is intended for First National members and staff and covers the practical aspects of Utopia eBooks. Inside this document is the information and resources you need to begin utilising your Utopia eBooks service to it's fullest and taking your office marketing to the next level. This document may be given to new staff members with no prior exposure to Utopia or used as a persistent reference for staff with more experience in Utopia. As we continue to build upon and improve Utopia eBooks we will continue to refresh and update this document to reflect the current state of Utopia.
Last revised:
10th February, 2021
Where to get help
If you can't find the information you're looking for in this document, contact First National support and one of our team will give you a hand. We encourage you to reach out to us with your questions as our aim is to offer the best possible resources to our members. Your questions may reveal missing information needing to be added to this guide that will assist members in future.
eBook basics
Accessing eBooks
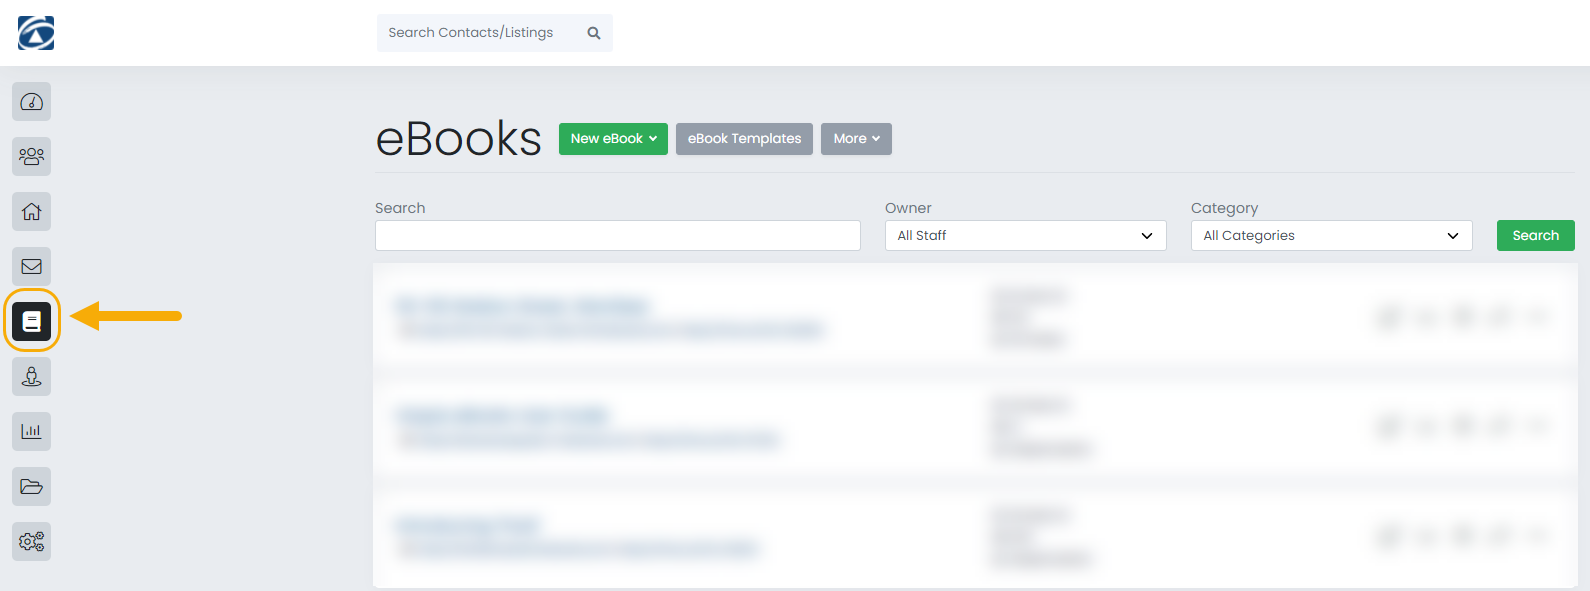
To access the eBooks module in Utopia, click the eBooks icon from the left hand menu:
Creating an eBook
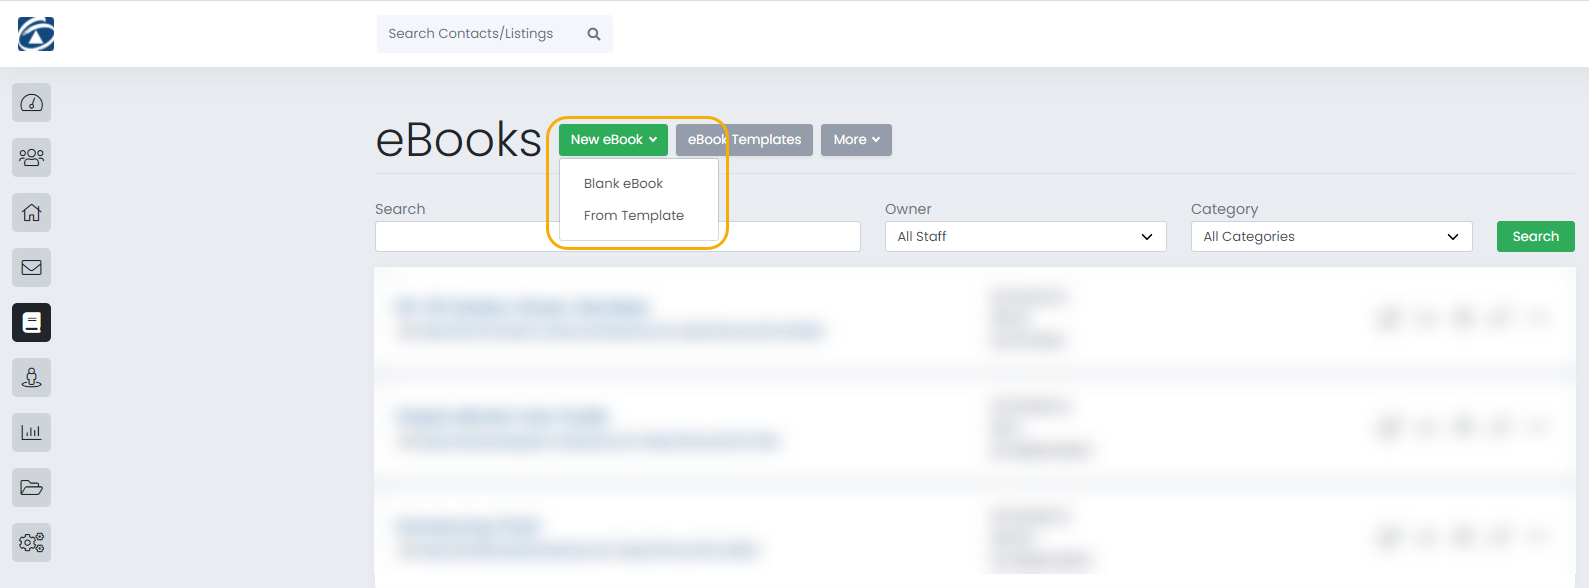
When making a new eBook, you can either create a new blank eBook or you can create an eBook based on an existing template. Templates are covered in a later section, for now we will only consider creating a blank eBook.
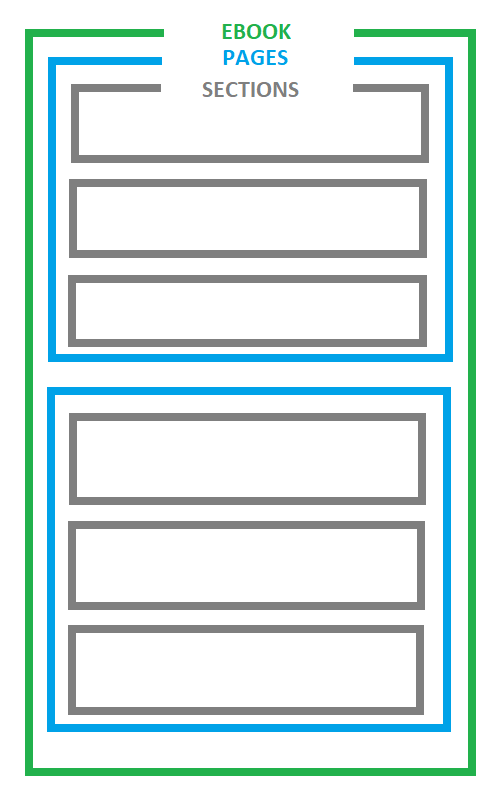
eBook
The main document/container composed of pages.
Pages
Pages are added to an eBook and act as a container for sections. An eBook may contain any number of pages.
Sections
Sections are the smallest container and are used to add the actual content to an eBook. There are various kinds of sections for different purposes and types of content.
Adding a page to an eBook
Once you've created an eBook, the next step is to create pages in that eBook to add your content (sections) to. To add a page to an eBook:
Step One
Enter the eBook you're working on by clicking on the Edit eBook button beside the title of the eBook.

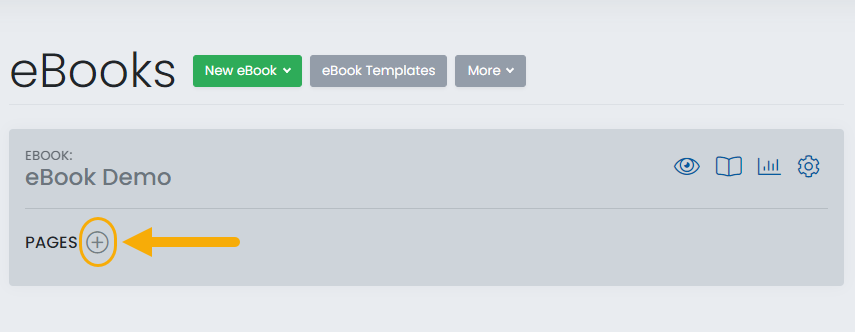
Step Two
Add a page using the '+' Add Page button at the top. On the next page, enter a name for your page and adjust any other settings as required. See the page settings section of this guide for more information on this step.
Managing eBook pages
Once you've added a few pages and some content to your eBook, you'll likely at some point decide you want to change the structure of your eBook. You might like to rearrange the order of pages, change the title of a page or even delete a page entirely.
To make changes to the pages of an eBook, from the eBook homepage, click the Edit eBook button which appears as an icon beside the title of the eBook you want to edit.

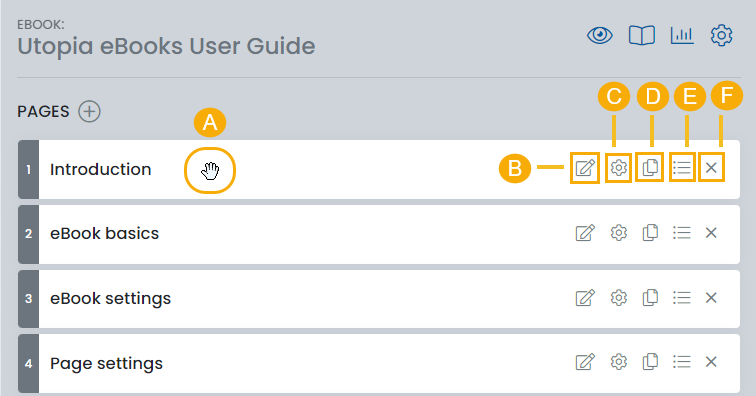
- Reorder pages by dragging them around when the little hand icon appears anywhere on the row (A)
- Edit page contents/view page sections by clicking the edit icon (B)
- View and edit page settings by clicking the settings icon (C) (see page settings section for more information on these settings)
- Copy a page to your page library by clicking the copy icon (D) (see templates section for more information on page templates)
- Use the Make Prefilled Content Section button (E) to save this section to use across any future pages within any eBook.
- Delete a page (including all page contents) by clicking the delete icon (F)
eBook settings
When you click the Add Blank eBook button shown above, you'll be taken to the settings page for your newly created eBook. You can access the settings for an already created eBook by clicking the settings icon next to the title of the eBook:

Explanations and details of each setting option are below.
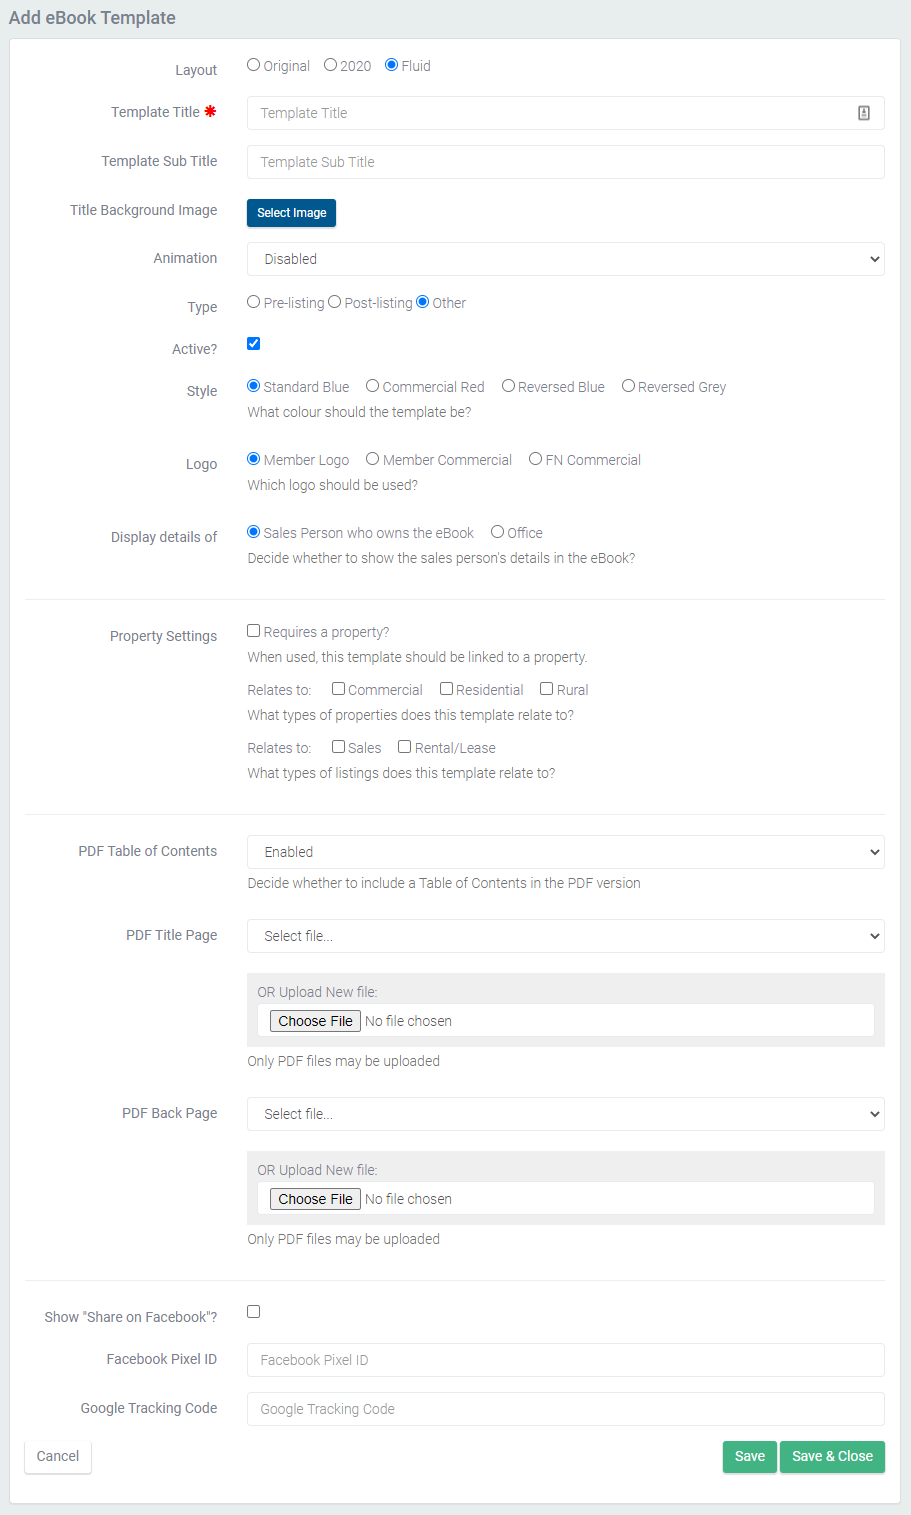
Basic settings
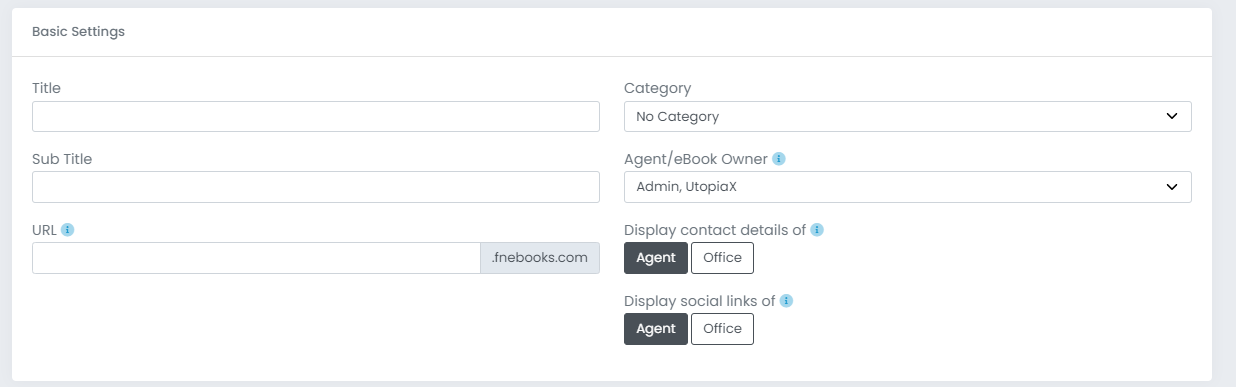
eBook title - the title you want to appear at the top of the eBook sidebar, at the top of the eBook title section and in the browser page name
eBook subtitle - the subtitle you want to want to appear beneath the eBook title in the title section
eBook URL - set a custom URL for your eBook
Category - add the eBook to one of your eBook categories
Agent/eBook Owner - the staff member in your database who 'owns' the eBook
Display contact details of - you can choose to either display the details of the agent who owns the eBook or the office in the menu bar
Display social links of - choose to have the social links go through to the office pages or the agents personal social pages
Display Settings
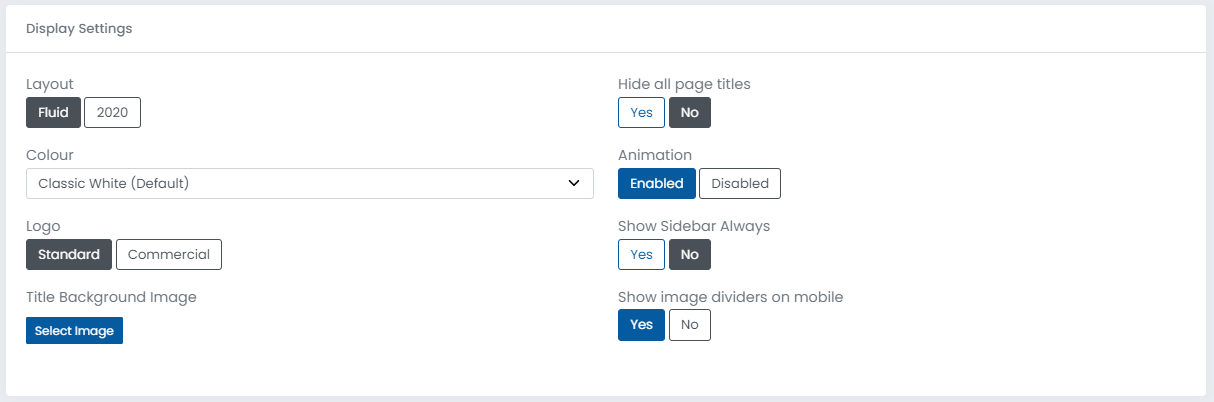
Layout - The layout template or 'look' of your eBook. We have two templates available for you to use: Our Fluid template and 2020 template.
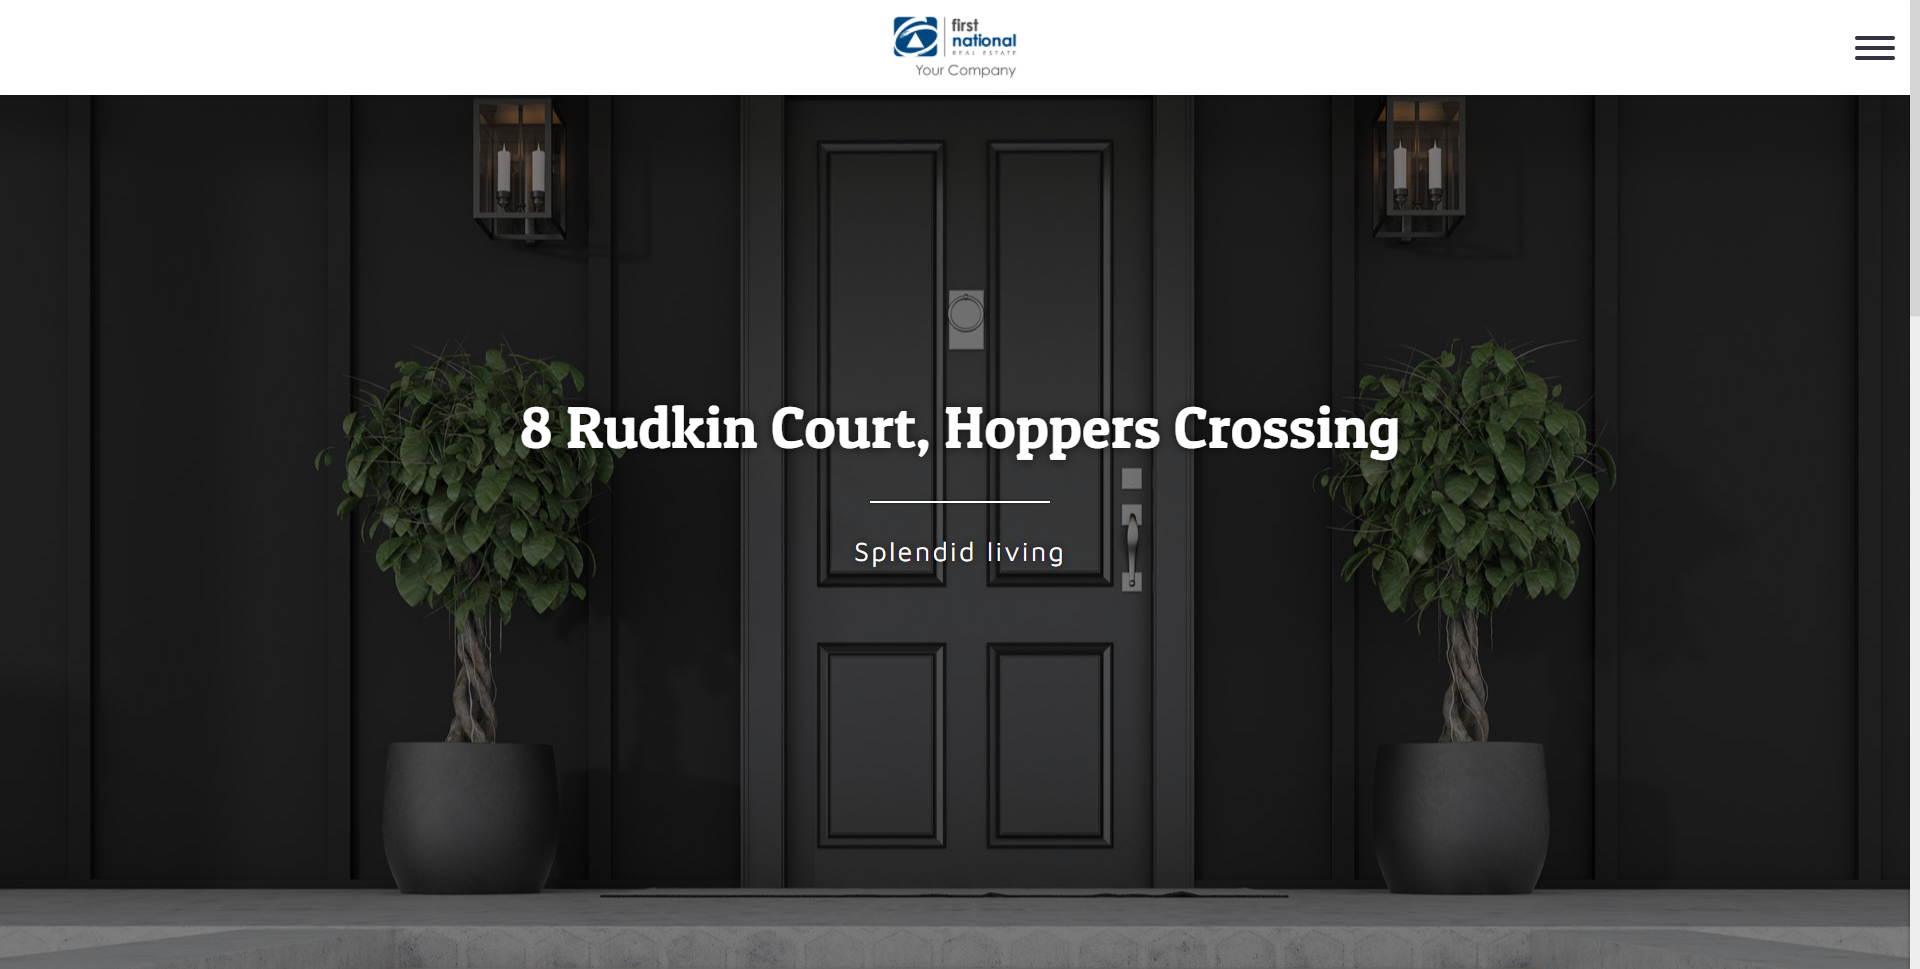
Fluid template
2020 template

Colour - the colour theme to use for your eBook
Logo - which of your office logos to use (if using a reverse colour scheme, your reverse logo will automatically be used)
Title background image - which background image/colour to use for the eBook or option to upload a new image
Hide all page titles - if set to Yes, page headings, title dividers and subtitles will be hidden from the eBook
Animations - enable/disable the subtle content fade-in animation
Show Sidebar Always - If set to Yes, the side menu will always be open by default
Show image dividers on mobile - If set to Yes, the image dividers will display on mobile devices as well.
Linked property

Linking an eBook to a property in your listings database allows you to add sections and features to the eBook that will automatically be filled in with the data and information for the listing. To link an eBook to a property, scroll to the Linked Property section, check the checkbox next to 'Linked to a property?' then search for the listing in the search bar that appears. Once you've found the correct listing, click the listing and then click 'Save'.
PDF Settings
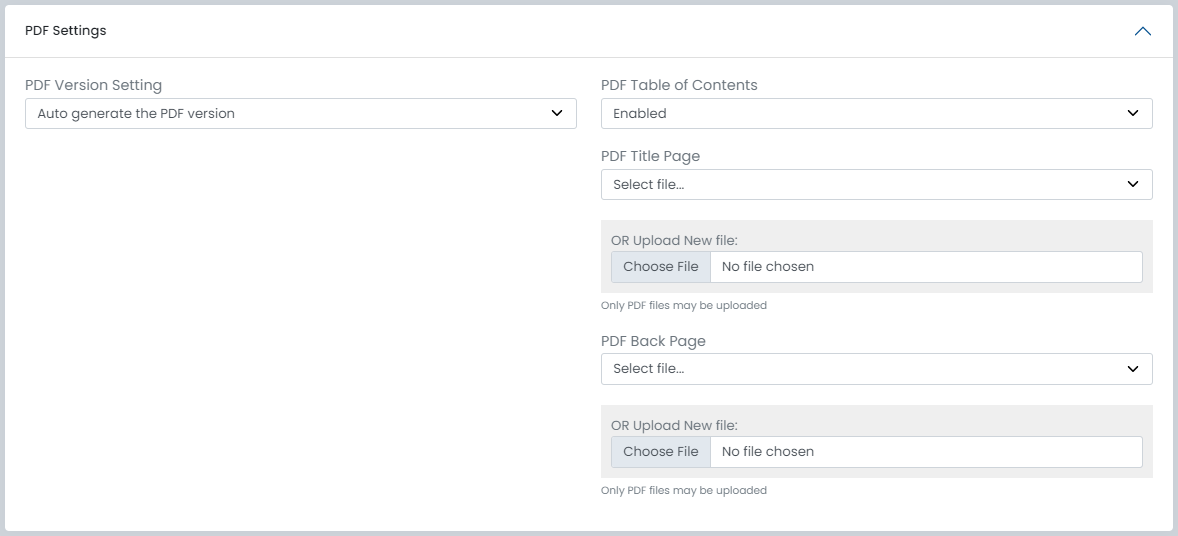
PDF version setting/table-of-contents/title page/back page - control whether the PDF and it's pages is automatically generated or whether you'd like upload a document to be downloaded when a viewer clicks download PDF
Advanced Settings
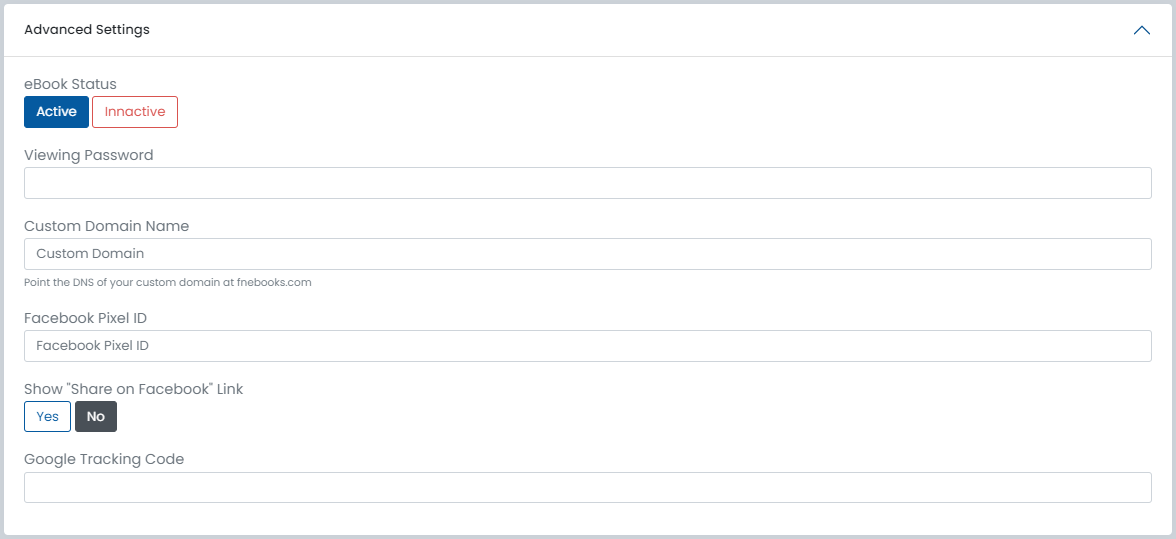
eBook Status - by default the eBook will be active.Turning this off means no one can access your eBook even if they have the link
Viewing Password - if on, a viewer must enter the password you provide here in the password field before being able to view the eBook
Custom domain name - (advanced) for users who want to use a different eBook domain than fnebooks.com
Facebook Pixel ID- if using Facebook Pixel tracking, enter your Pixel ID here
Show "Share on Facebook" link - Setting this to Yes will display the share links on your eBook
Google tracking code - if using Google tracking, enter Google tracking code here
Page settings
To view or edit the settings of a page in your eBook:
Step One
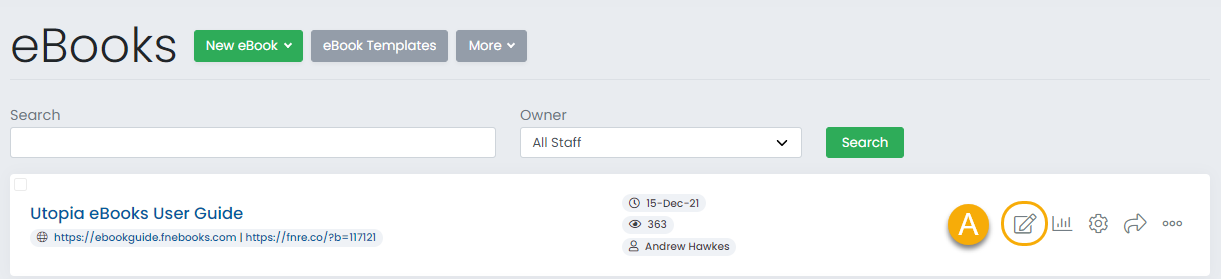
From the main eBooks screen click on the Edit eBook icon (A) for the eBook you are working on.
Step Two
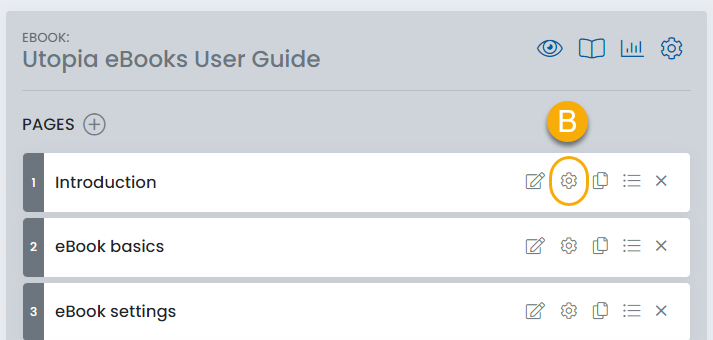
Click on the Page settings (B) icon at the right hand side of the page title
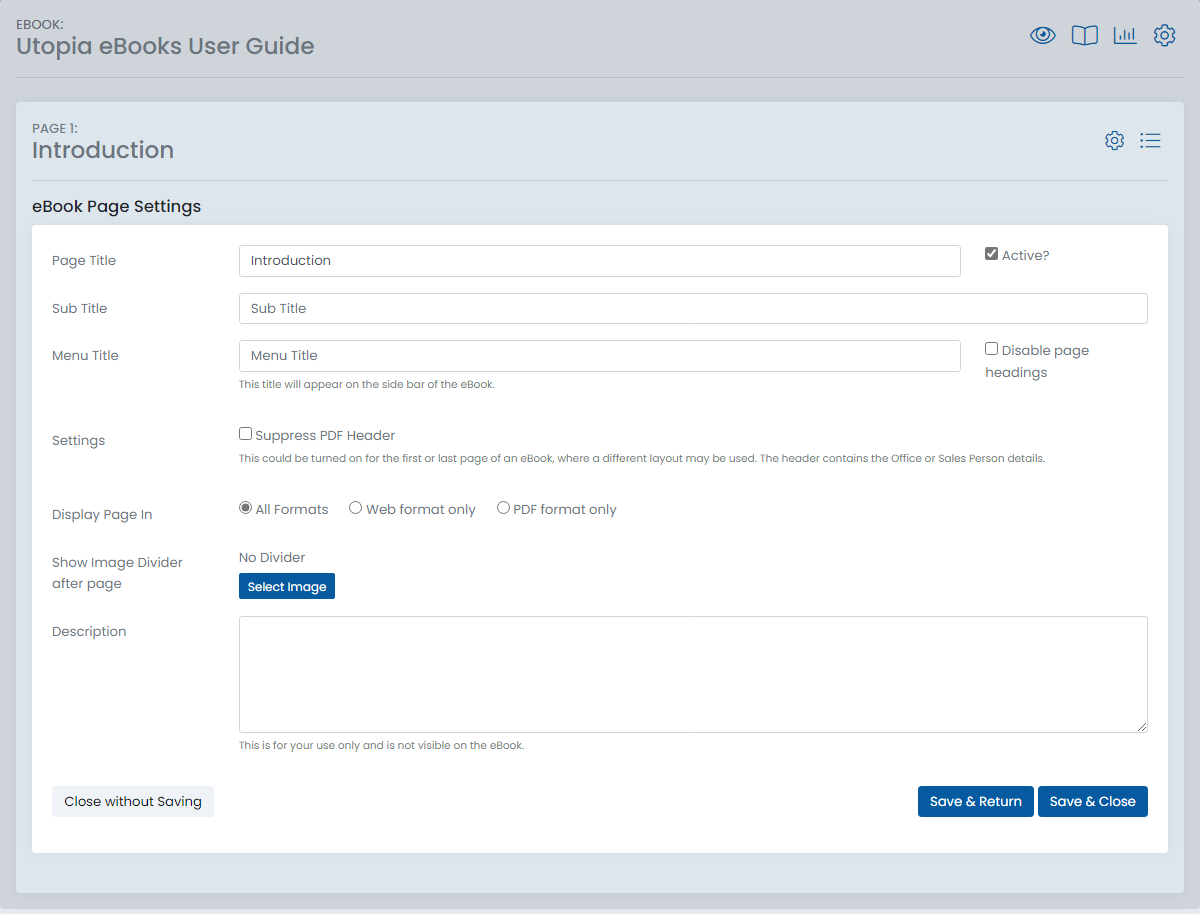
Page title - the text that will appear at the top of the eBook page, as well as in the sidebar unless Menu title is also set.
Active? - set by default, if deactivated then the page will not appear in the eBook.
Sub title - if set, this text will appear on the eBook page beneath the page title.
Menu title - if set, the text that will appear for the page in the menu sidebar of the eBook.
Disable page headings - if selected, the page title, title divider and subtitle will not be displayed for this page
Suppress PDF header - by default, when downloading a PDF version of an eBook then each new page will have a PDF header at the top. Use this setting to deactivate the header for particular pages if desired.
Display page in - default is All formats, can elect to show the page ONLY on the web or PDF version of the eBook.
Show image divider after page - choose an image to follow a page and act as a divider between it and the following page. By default no image is selected.
Description - an optional description you can give the page. This will not appear on the eBook and is only visible by you.
The text editor
Adding your own content to certain sections in Utopia is done using the embedded text editor. It natively supports adding and formatting text and images.
Those familiar with document editors like Microsoft Word will find it intuitive to use with many of the same layout and text-formatting features.
Not all of the editor features and options present in the editor toolbar are used in eBooks. Below is a summary of the various editor features that are available and possible for you to use in your eBooks.
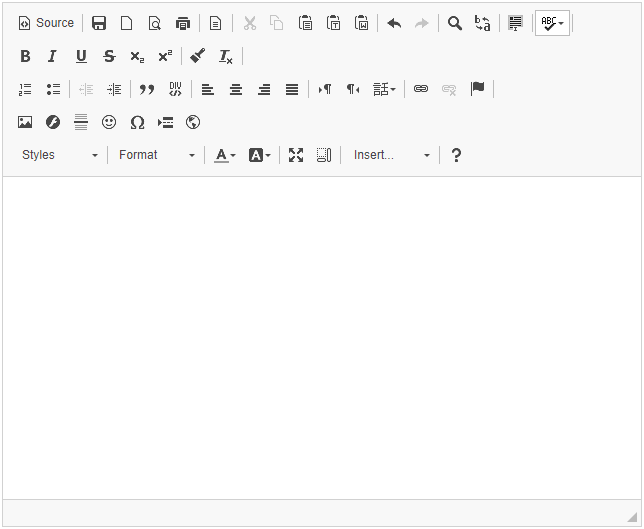
Source

The source button allows you to directly view and edit the HTML being generated by the text editor. Don't panic if you're not familiar with or have never heard of HTML - it's unlikely you'll need to use this feature.
Text formatting

The editor has the same common text formatting options found in most text editors:
- Bold text
- Itallic text
- Underlined text
Strikethrough text- Subscript
- Superscript
You can also copy formatting from any text currently inside of the editor. This is useful if for example you wanted to copy the text colour/boldness of some existing text in the text editor and apply it to some new text. Highlight the text you want to copy the formatting of, press the copy formatting button (7) then drag your mouse to highlight the text you wish to apply the formatting to. Once you release your mouse on your selection, the formatting will be applied to your selection.
To clear the formatting of the selected text, use the clear formatting button (8).
Note: We recommend going easy on formatting text and only using formatting options when it will add meaning to the text. Bolding or itallicising text should be done only to key words or phrases in the text to draw attention to them but it's not usually a good idea to make whole paragraphs bold. This won't add any meaning to the text and can make things visually overwhelming or inconsistent. We also don't recommend using text formatting options on heading text as this font is already very bold. Check out Design tips for more information about consistent formatting.
Lists

Separate distinct points into lists. You can add:
- Ordered lists (1,2,3...)
- Unordered lists (dot points)
Sublists
You can further indent list items and create sublists when required. When editing a list item, press TAB to indent that list to the right and turn it into a sublist. Once you're finished your sublist and want to return to the original list, press SHIFT + TAB. e.g.:
- Thing one
- Thing two
- Subthing one
- Subthing two
- Subthing three
- Thing three
Line breaks in lists
You can break to a new line inside a list item without going to the next item or exiting the list. When editing a list item, holding the SHIFT key while pressing ENTER will go to a new line but will stay inside the same list point. You can use this to add content on the next line of a list item or to add space between list items. e.g.:
- Thing one
- Thing two
More text on the next line - still in thing two
Another new line - still in thing two
I can add as much spacing as I want at the bottom of list items this way as shown below - still in thing two - Thing three, with a bit more space than the last few points
- Thing four
- Thing five
(end of list)
Allignment

Like most text editors, you can control the horizontal allignment of the content. The alignment settings are:
- Left-aligned
- Centred
- Right-aligned
- Justified
Links

You can create links that link to other webpages or resources. Highlight the text in the editor that you wish to be the link, then click the link button (1). Enter the link address as well as the link text. Should you ever want to remove a link from your eBook, highlight the link in the text editor and click the unlink button (2).
Font format

By default, the text you enter will be in normal or paragraph format which is the standard text size, font and weight. There are several other Heading font formats to chose from which will present the text in a different heading font and at different sizes. The available heading sizes range from Heading 1 (largest) to Heading 6 (smallest). For the majority of purposes, something between Heading 1 and Heading 4 should suit your needs.
Images

You can add images of JPEG, PNG and GIF formats to your eBooks via the text editor. To add an image to your eBooks, click the image button (above).
In the window that appears, click the Upload tab at the top and browse for an image on your computer you'd like to use. Once you've selected an image and clicked 'Open' in file explorer, click the Upload file button below the name of the file.
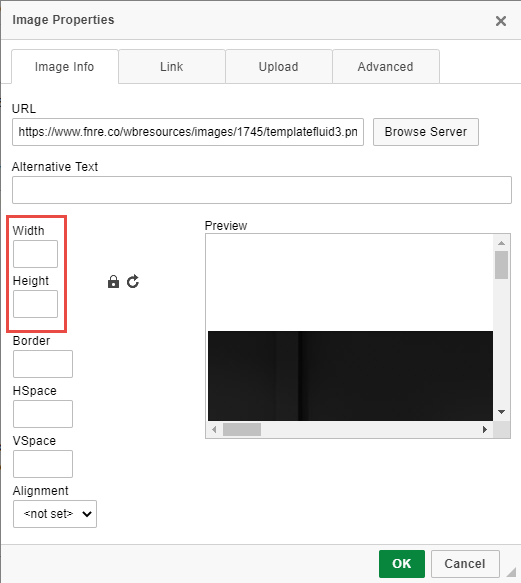
You'll be taken to the properties for the image you just uploaded. Note the width and height values of the image have already been entered. In nearly all situations it's best to clear the text from these fields so that they're empty, as this will avoid sizing issues on different screen sizes. Once you're done, click the OK button at the bottom right of the image properties window to return to the text editor.
Font colour

You can change the font colour of the selected text using the font colour options by clicking the above button.
Horizontal line

To add a horizontal line in the text editor to break up bits of content, click the horizontal rule button shown above.
Insert content

There are a handful of eBook section types that can be added within a text section through the text editor. To see what you're able to add via the text editor, click the insert button. Use this button to insert content blocks such as page dividers and CTA buttons.
You can also use the insert button to add merge fields to your eBooks. Merge fields are segments of placeholder text placed between square brackets (e.g.: [property-address]) that are replaced with relevant data when the eBook is viewed. They're best used in ebook templates to allow property specific data to be added to an eBook based on which property the eBook is linked to. Read more about how to use merge fields and see a full list here.
Iframes/embedded content

Note: you may experience issues when adding iframes to your eBooks text sections or find that videos you embed don't appear correctly. For this reason we generally discourage embedding videos into the text editor and instead recommend using the video section type available in eBooks instead. Contact support@firstnational.com.au if you experience issues with iframes/embedded content.
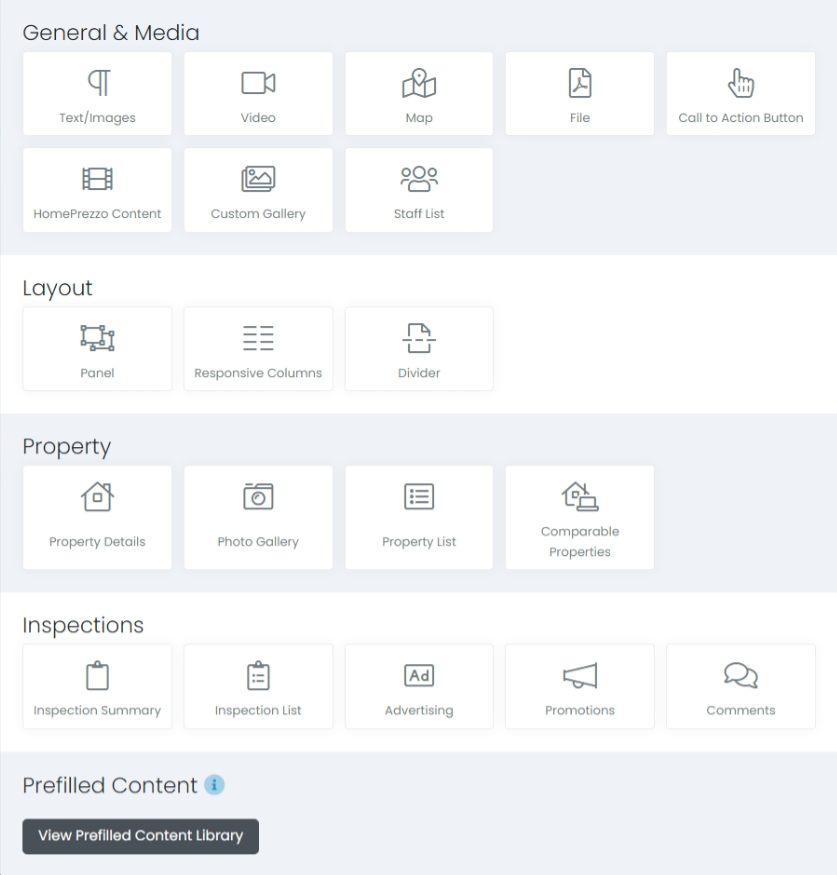
Section types
Your eBook content is added through sections. There are different types of sections for displaying different kind of content as well as sections for inserting prefilled content and layouts.
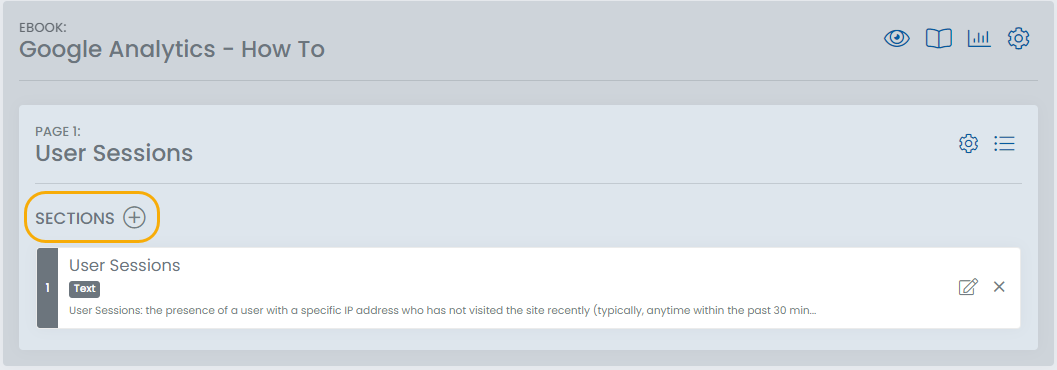
Step One
Inside a page in your eBook, click on the '+' next to Sections.
Step Two
Select a section type to use from the pop up modal.
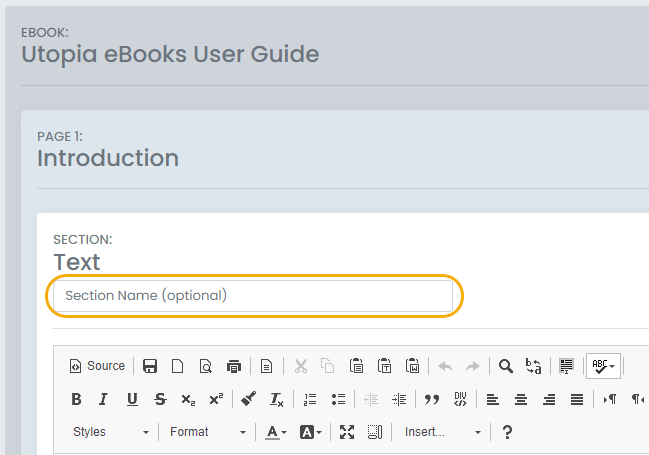
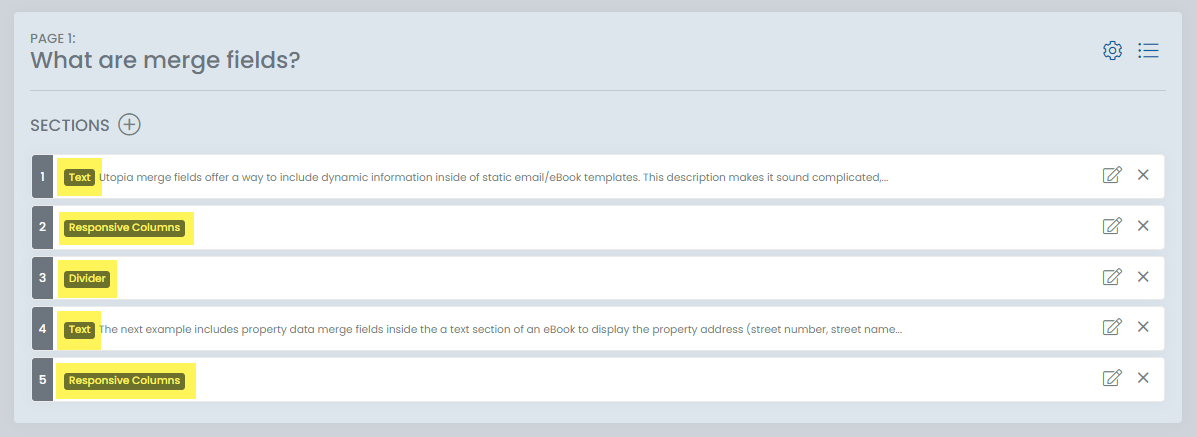
Most sections contain a field which allows you to assign a name to that particular section.
These names appear in bold beside the name of the section type under the manage sections interface for a page, helping you to identify the various sections that make up your eBook and make things easier to use.
This section supports adding simple text and image content as well as some other content via Utopia's text editor.
Read the text editor section in this eBook to find out more about what content can be added using the text editor and how.
Video
Include videos in your eBooks, either by linking to the page with the video or embedding the video directly into the eBook.
When adding a video section to your eBooks, you're presented with a few different options:
- Option 1 prompts you to enter the embed code for the video which can be obtained from where the video was sourced from
- Option 2 allows you to simply enter the address of the video and it will add a textual link to the video
- Option 3 allows you to include the property video if your eBook is linked to a property in your property database and that listing has a property video associated with it
Generally Option 1 is the best option as long as you're able to copy the embed code for the video you'd like to embed in your eBook. Sites like YouTube, Vimeo etc. make this very easy. Contact support@firstnational.com.au if you're unsure how to embed a video in your eBooks.
Map
Select the Map section type to insert a Google Maps plugin into your eBook displaying either:
- Option 1: the address of the property linked to the eBook, or
- Option 2: an address that you enter yourself
File
Create a link to download a file. When creating a File section the options are:
- Option 1: Upload a PDF file,
- Option 2: Select a PDF file from your file library, or
- Option 3: Provide a link to the file to be downloaded
Panels
Panels are a new way to present content to your audience in a manner in which they can navigate between sections of that content without having to scroll up and down the page to find what they're looking for.
The panel tabs remain at the top of the screen even when scrolling down the section so there's no need to scroll back to the top of the section to access the other content. This dynamic approach improves user experience, meaning the reader is more likely to read the content you've written.
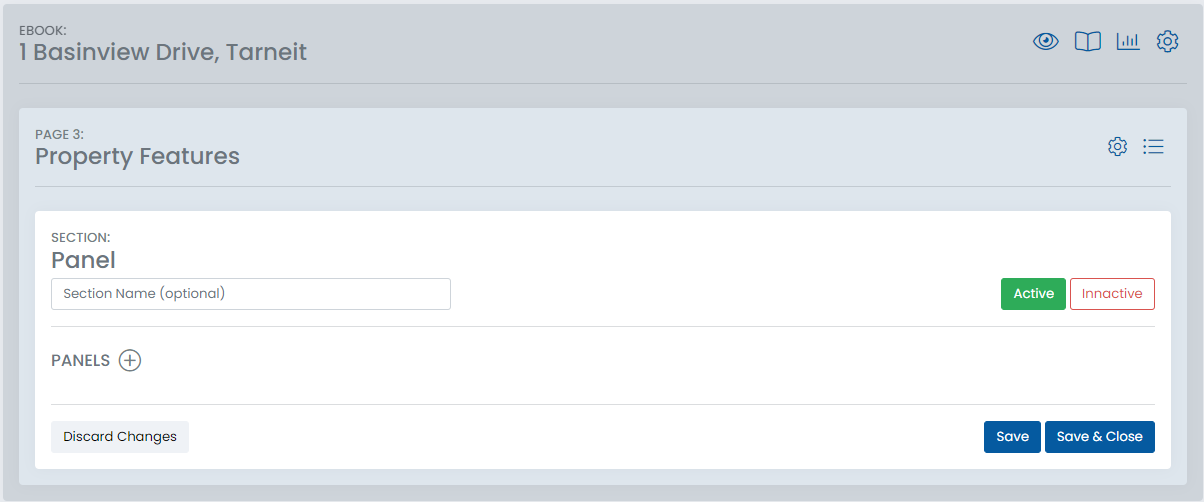
Adding a panels section
When you add a panel section to an eBook page, you'll be taken to the settings page for the panels section you've just created. Add a panel to your panels section with the 'Add Panel' button.
On the following screen you'll be able to enter the panel title and edit the contents of the panel.
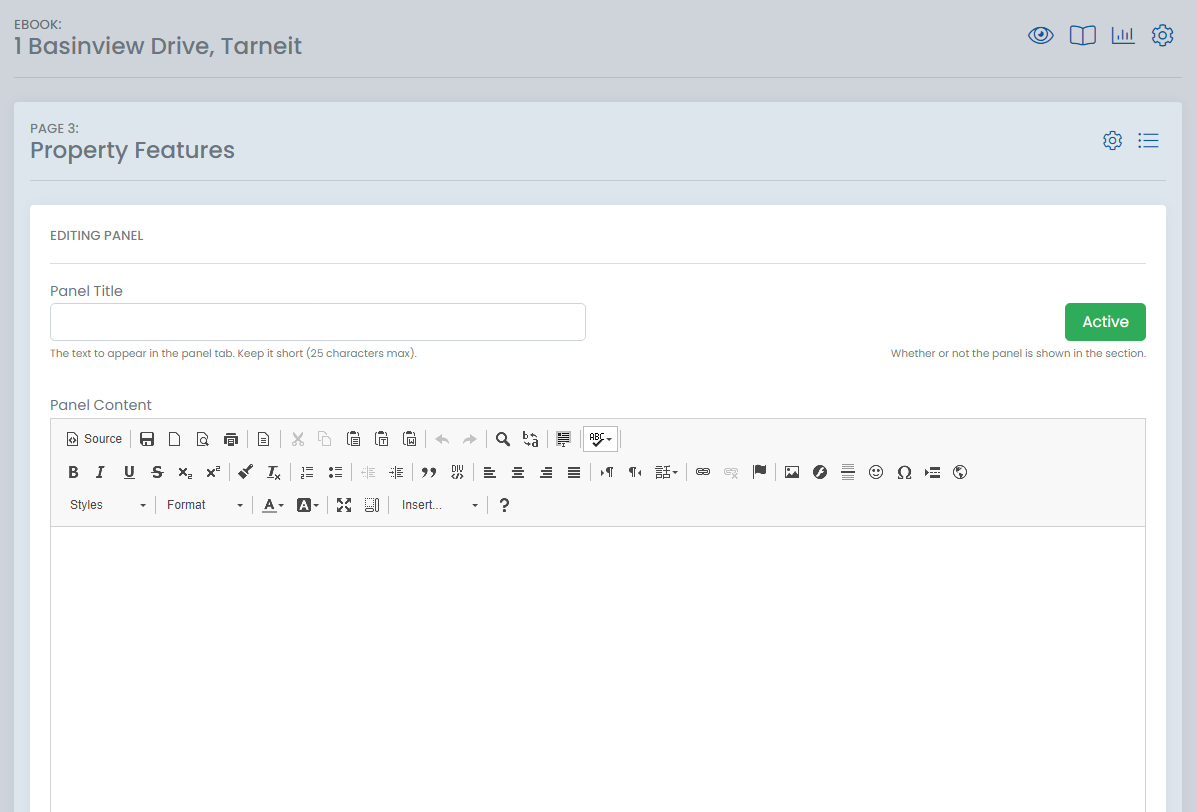
Note: we recommend keeping the panel titles as short as possible to avoid issues with long text in the panels tabs. There's no strict limit to the length as the tabs will lay themselves out depending on the length of the titles, though long titles can appear a bit strange. For this reason we recommend a max length of about 5-6 words or ~40 characters for the panel titles.
Once you've added your panels to your new panels section, the setting screen for the panels section will look like this.
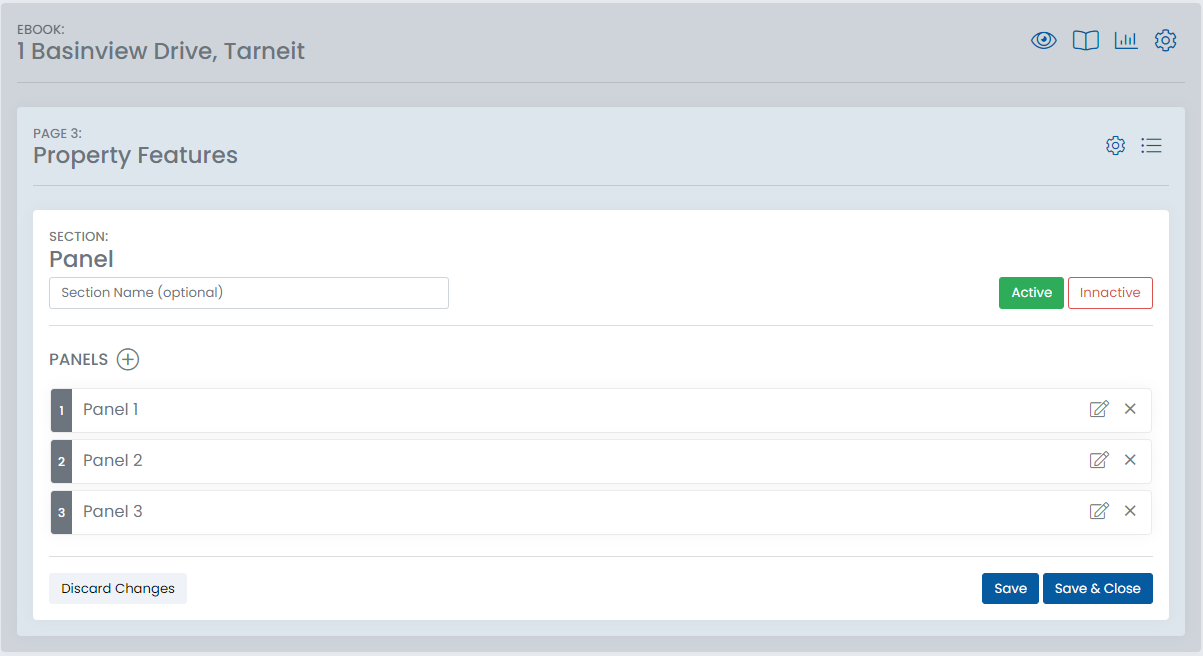
From here you can:
- Change the order of the panels by dragging them up and down
- Edit panel contents using the edit button
- Delete a panel using the delete button
Responsive columns
Responsive columns allow you to create content that will appear side-by-side in columns on wider screens like on a PC/large tablets but will 'wrap' or rearrange themselves vertically into fewer columns on smaller screens so that your content still looks good and is readable.
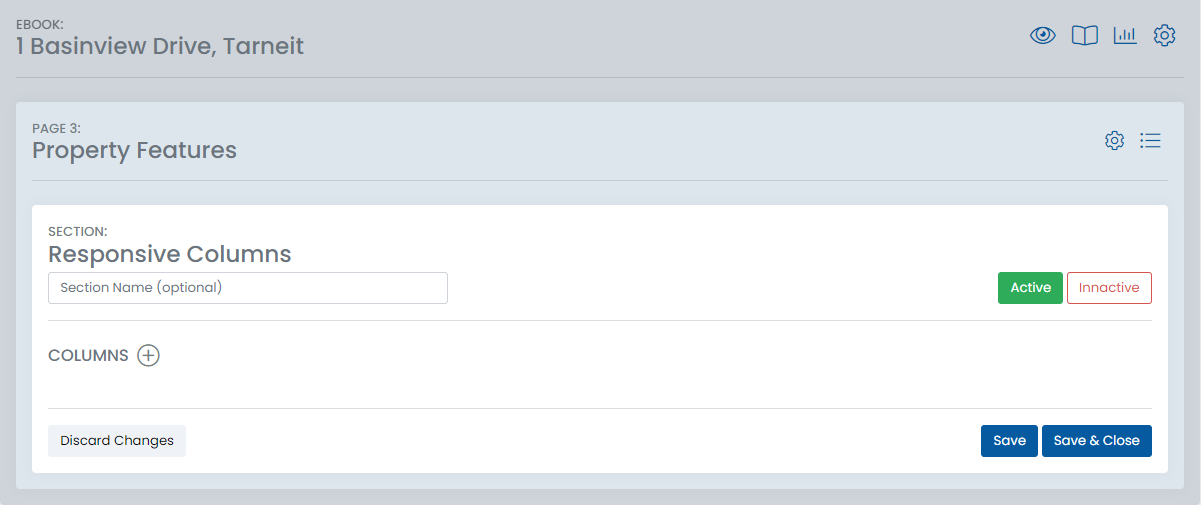
Adding a responsive columns section
When you add a responsive columns section to a page on your eBook you'll be taken to the settings page for your responsive columns section. Start by adding columns to your new section using the '+' icon next the word Columns.
Once you've added columns to your responsive columns section, clicking on a column tab at the top of this page will display the settings for that particular column as well as a text editor to edit the contents of the column.
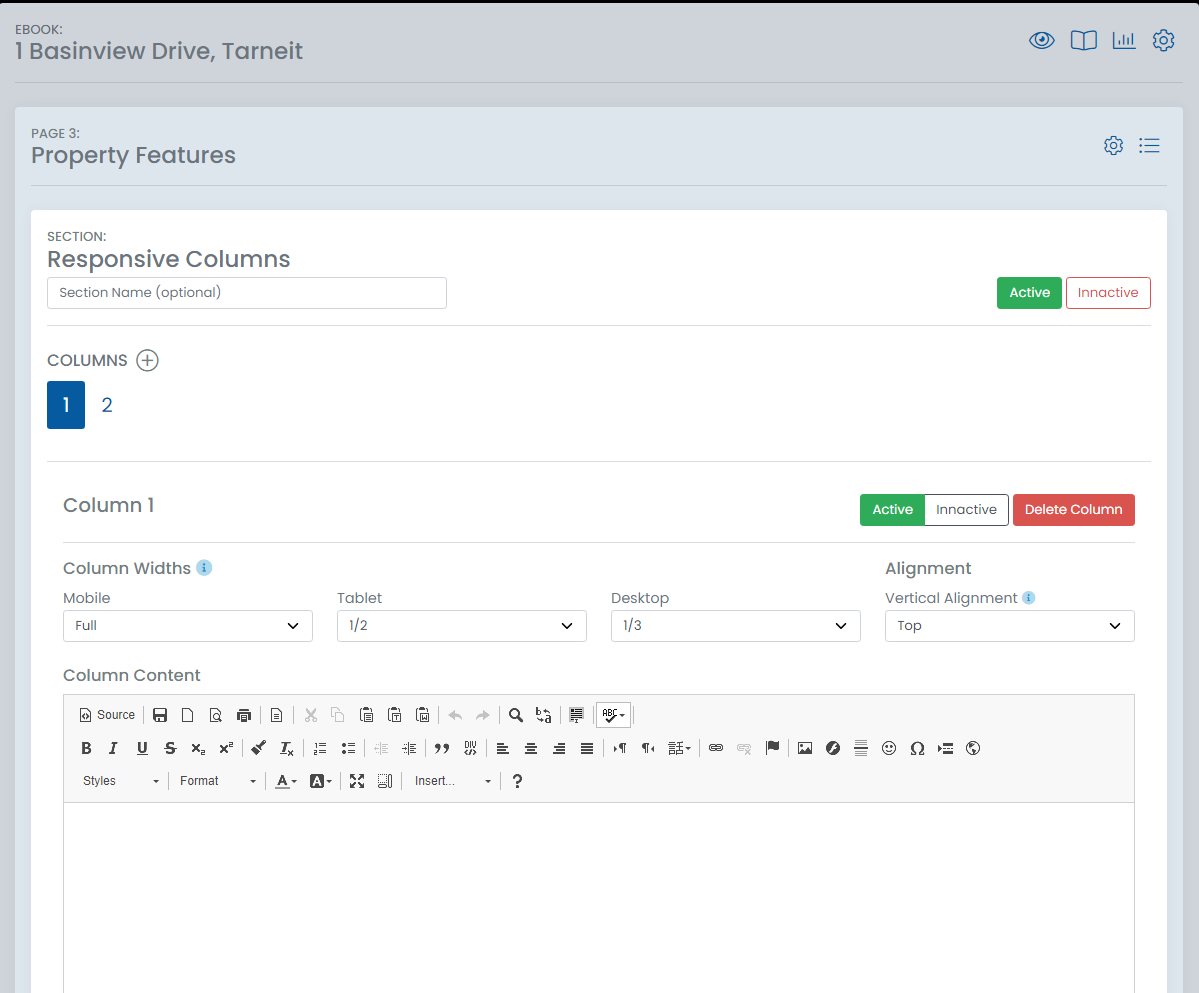
Column settings
Under the settings for each column is where you can control the width of the column at different screen sizes, as well as the vertical alignment setting for the column.
Column width settings
To correctly set the column width settings, you'll need to have an idea in your head about what your layout will look like on different screens. Quickly drawing out your layout on a scrap of paper may help you visualise the width settings, or you can just play around with them until your layout looks good to you. Generally when you have several columns next to each other, you want the widths of these columns to add up to 1/full-width.
So for example if you set Column 1 to have a width of 1/3 on desktop and you want Column 2 to take up the remaining space beside it, you'd set the desktop width of Column 2 to 2/3. If you wanted three even width columns on desktop, you'd set the Desktop (large) width of all three columns to 1/3. If you wanted 2 even columns, set both column widths to 1/2 etc.
Vertical Alignment
This setting controls how the content in each column will be vertically aligned if the column is longer than the content inside of it. This is useful if you have a large image in one column and a small amount of text in another, and you want the text to line up with the top, midline or bottom of the image. The default is top-aligned - throughout this section the columns have been given the 'Middle' vertical align setting.
Best practices/more information
- Generally, the Mobile (small) width setting for each column should be set to Full screen width,
- You should always endeavour to have all columns on each 'row' at each screen size add up to 1/Full screen width,
- The maximum number of columns you can use in a section is 4, and the minimum width setting is 1/4. To achieve layouts with more columns you will need to create multiple responsive columns sections.
Divider
Dividers allow you to space and separate your content to make it easier to read and keep it grouped into logical blocks.
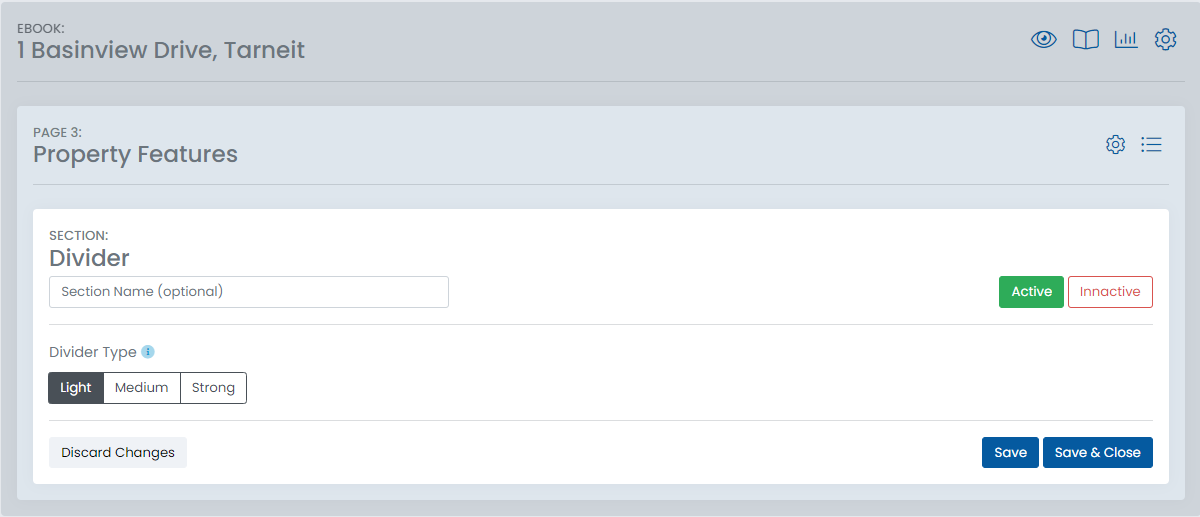
When adding a divider to your eBooks, you'll be taken to the settings page for the divider. You can select between three different divider 'weights' - light, medium or strong. The light divider appears as a fine line and provides a small amount of spacing between sections. The medium divider appears as a thicker and wider line and adds a bit more spacing, while the strong divider appears as a line across the entire page and adds a large amount of spacing between sections.
Call-to-Action buttons
The new Call-to-Action (CTA) button section type allows you to display large eye grabbing links which direct the viewer to perform an action. You can use these links to direct traffic to your website, link to forms/other web pages or create contact links that allow viewers to email/phone your office or staff by clicking the link.

When adding a CTA button to an eBook page you'll be taken to the above CTA settings page. There are three key settings:
- Link type - the type of link. Website is the default for when you'd like to link to an external website/webpage. You can select email address or phone number to call or sms if you'd like the link to begin a new email or phone call/sms when clicked
- Link URL - the address of the link. For a website, this is the website domain (e.g. https://example.com). If phone number or email address is selected, simply input the necessary phone number/email address
- Button text - the text displayed inside the button link, e.g. "Email us" or "Visit our website"
Property details
Property details sections take data about a listing in your database and places it in a beautiful already-defined layout inside your eBooks. There are residential and commercial specific layouts to ensure that all your listings are displayed with the most relevant information.
Note: in February 2021, Manual property details sections were added to eBooks, meaning you can create a property details section for a property even if the property is not in your listings database. See below for instructions.
When you create a property details section, you'll be taken to the below settings page:
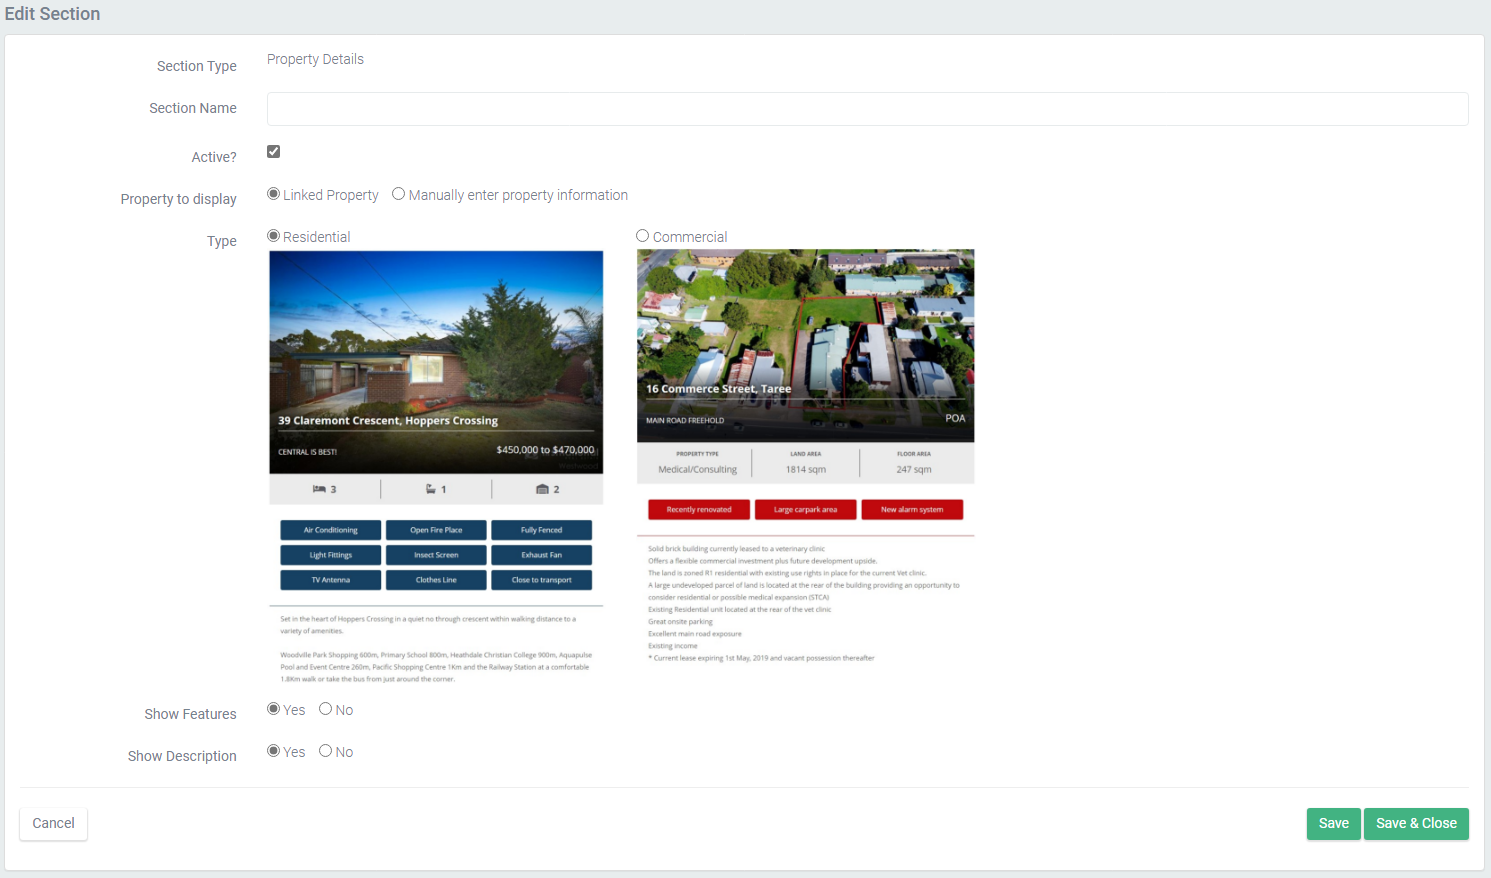
- Property to display - choose between adding a section for a property linked to the eBook or manually adding the property information
- Type - choose between a residential or commercial layout
- Show features - whether to show the property features
- Show description - whether to show the property description
ADDING A PROPERTY DETAILS SECTION MANUALLY
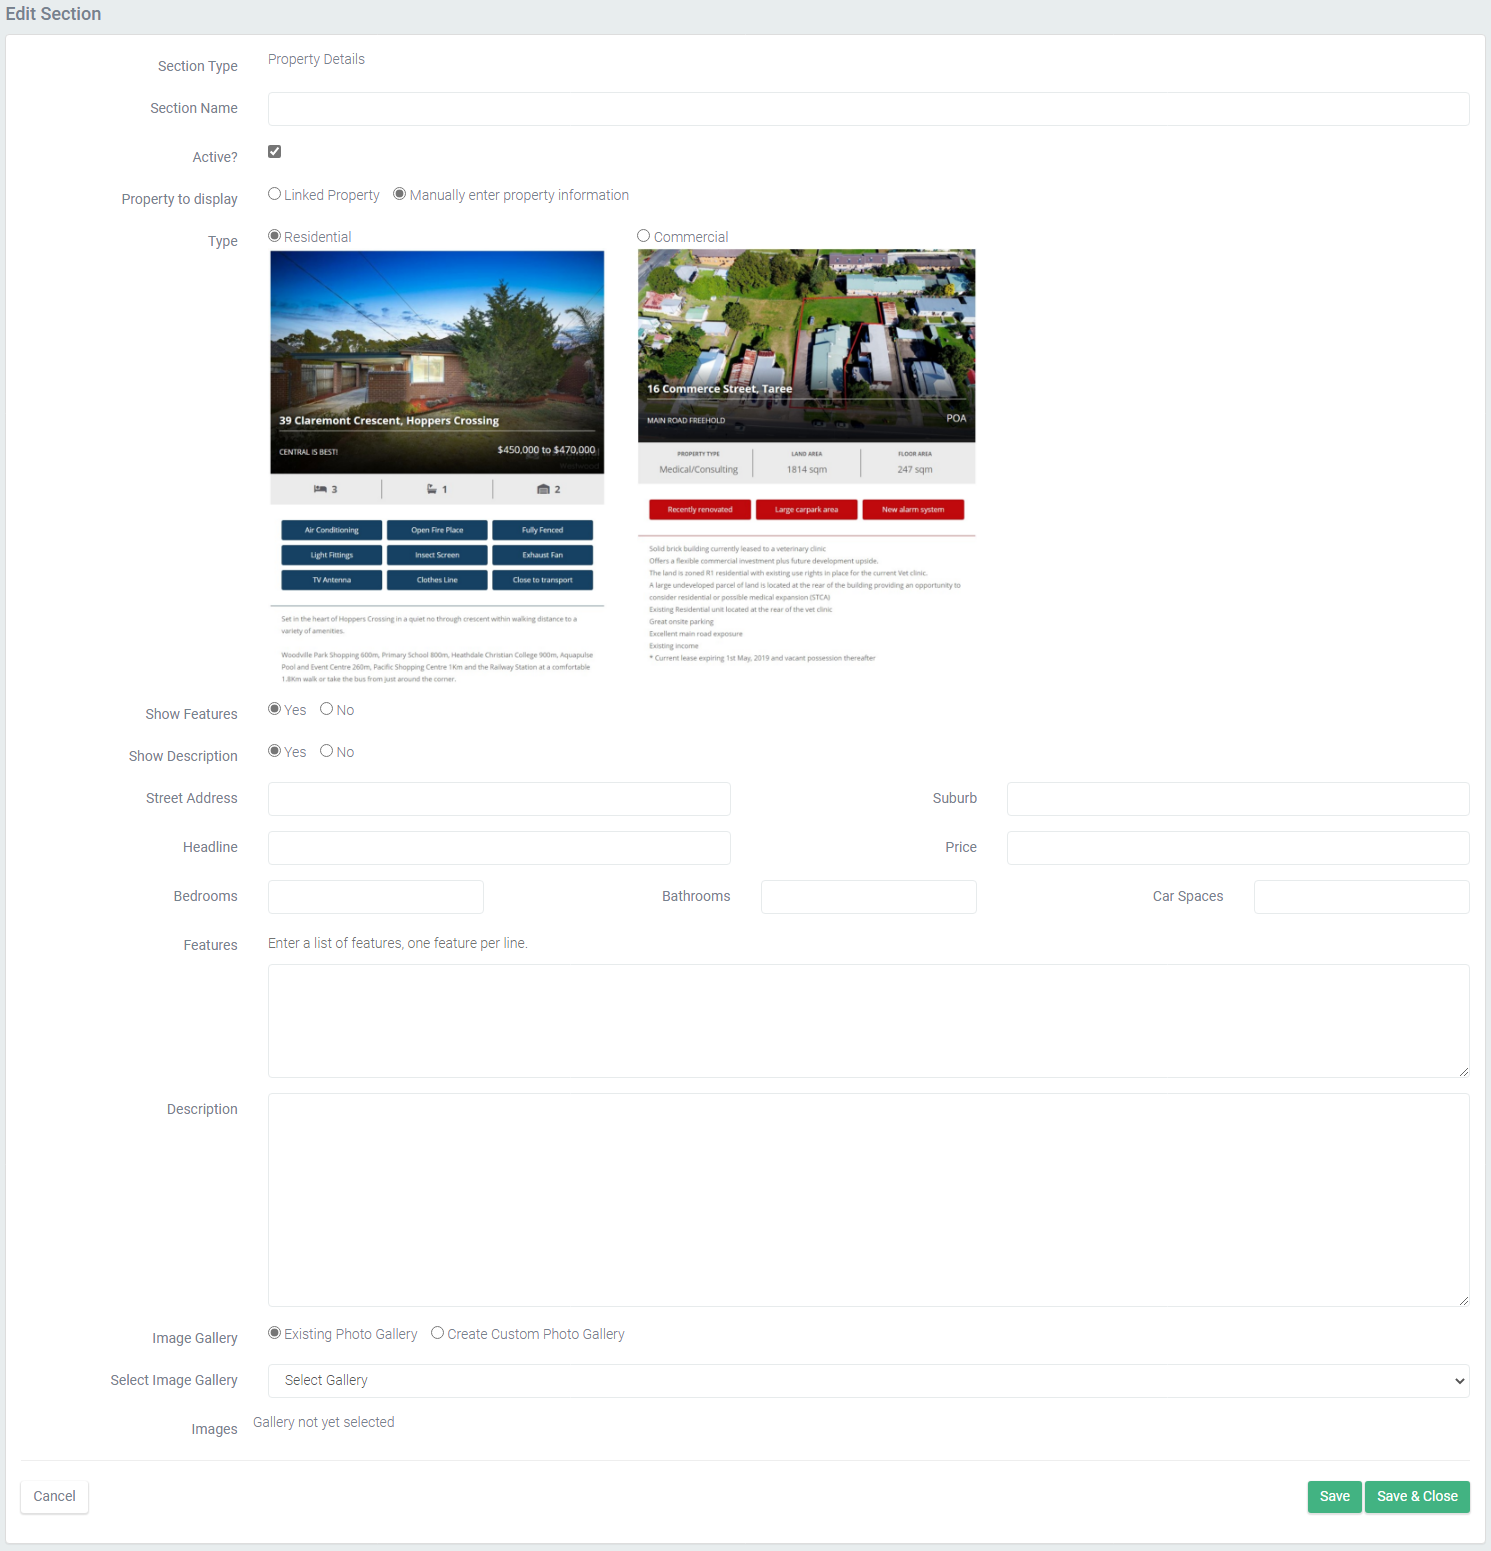
Under Property to display, selecting Manually enter property information will reveal the above fields. If the commercial template is selected you'll be prompted to enter land/building size information instead of room info. Enter any information you want to display for the property, then either select an image gallery for the property you've already created or go through the process of creating an image gallery. See the custom galleries section for more information. Once you've entered all the relevant information and selected an image gallery for the property, click Save.
Photo gallery
(requires eBook to have a linked property selected)
This section allows you to add a large photo gallery of a listing using the images you provided for the listing.
Adding a Photo gallery section will display the below settings:
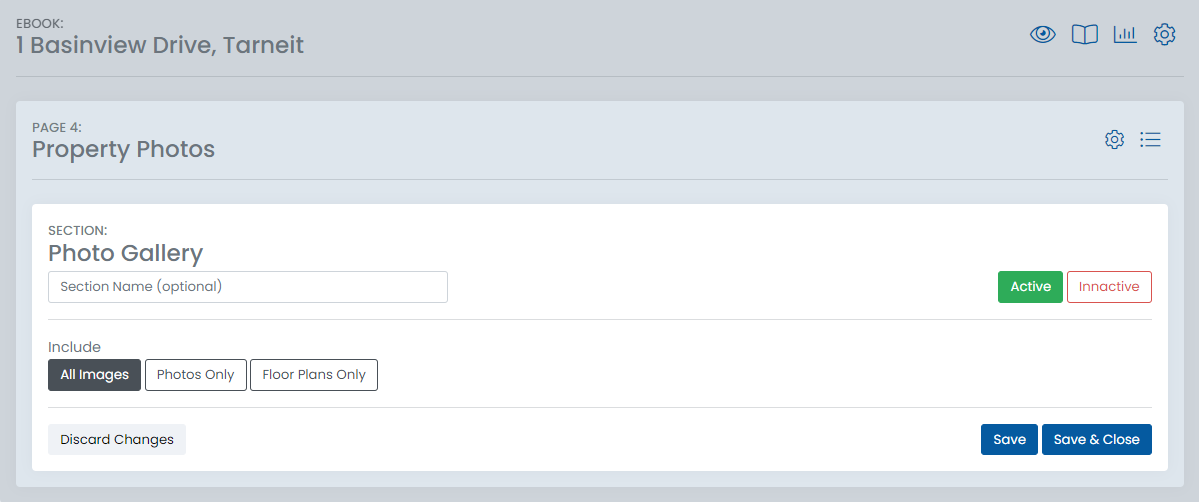
Include: choose to include all images, or exclude floor plans or other property images.
Property list
Display a number of your sold or current listings in an attractive list. Available in two variations - the default contains the property description while the other version contains simply a link to the listing on your website (if your CRM supports this), increasing web traffic.
When you create a property list section, you'll be taken to the below settings page:
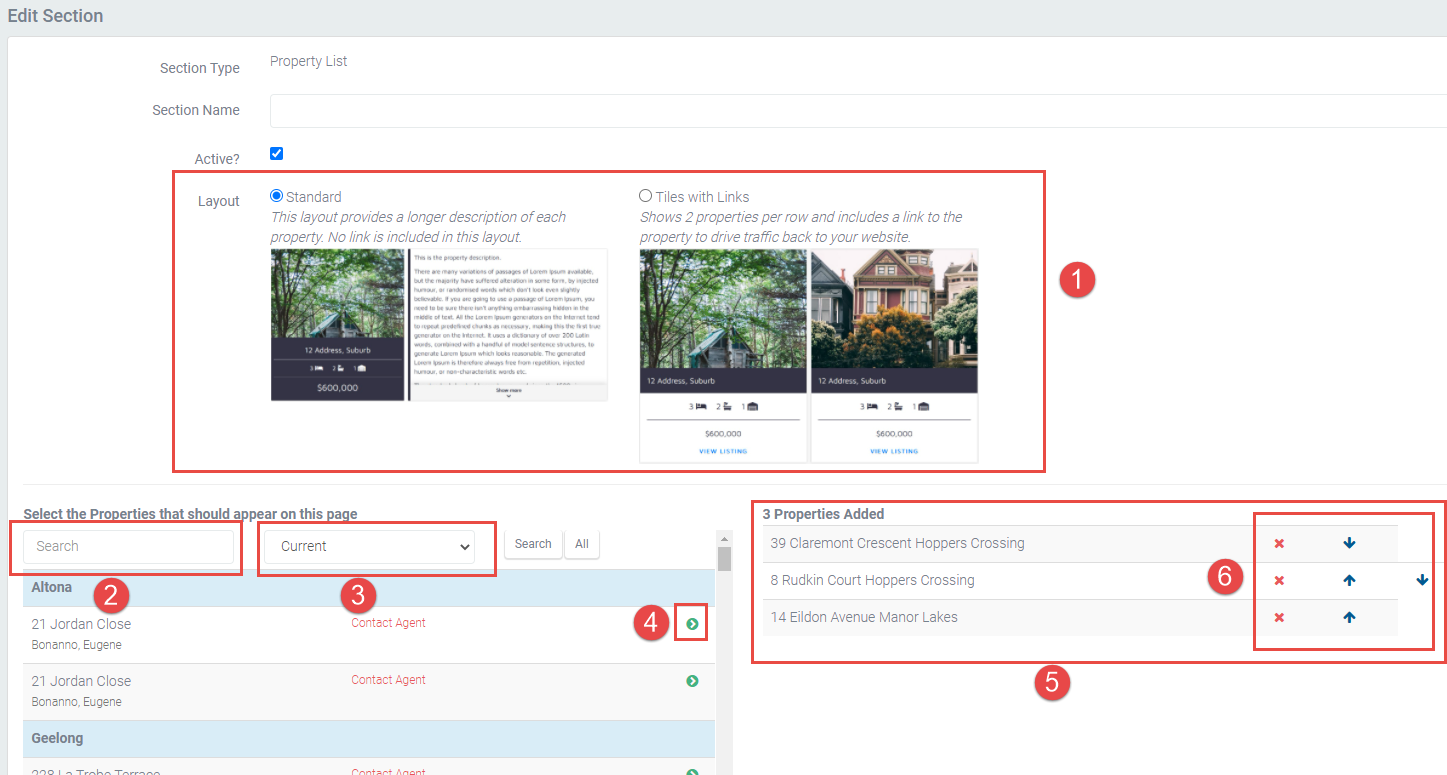
- Select which layout to use for your property list
- Search for the properties you want to add to your list using the search bar
- Change between searching your current listings/sold listings using this dropdown option
- Add properties to the list using the green arrow beside the property
Note: if using the layout with website links in step (1), it's best to select an even number of properties - Properties you add to your property list will appear on the right
- Use the red X's and blue arrows to delete or rearrange properties in your property list
Comparable properties
The comparable properties section type powered by CoreLogic property data allows you to search an address or suburb and returns all similar properties sold, leased, listed for sale or listed for rent in the same area based on your search.
When you create a comparable properties section, you'll be taken to the below settings page:
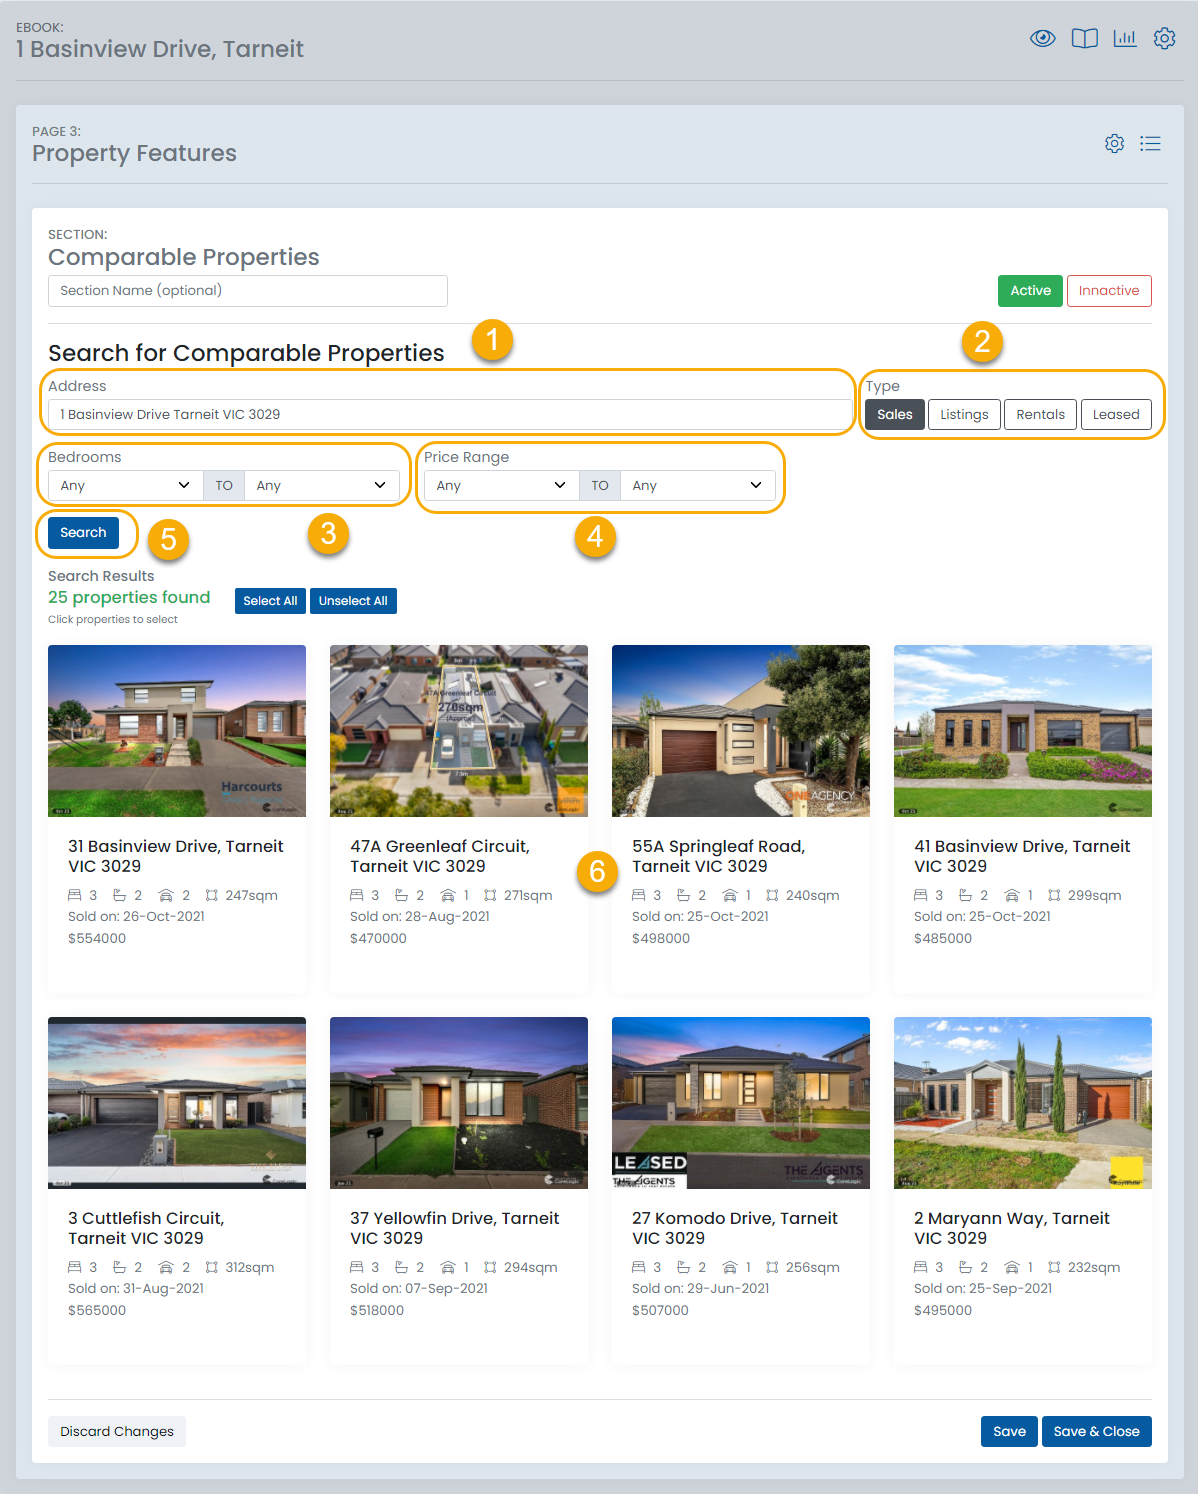
- Enter an address to search for similar properties or a suburb to search for all properties in the area
- Select the type of property to search for: sales, listings, rentals, leased
- Select a bedroom range (optional)
- Select a price range (optional)
- Click on Search
- After a while the results of your search will appear in the search results window - select the properties you want in your comparable properties section
HomePrezzo content
HomePrezzo sections allow you to embed content you've created under your HomePrezzo account like suburb reports, market videos etc.
When you create a HomePrezzo content section, you'll be taken to the below page:
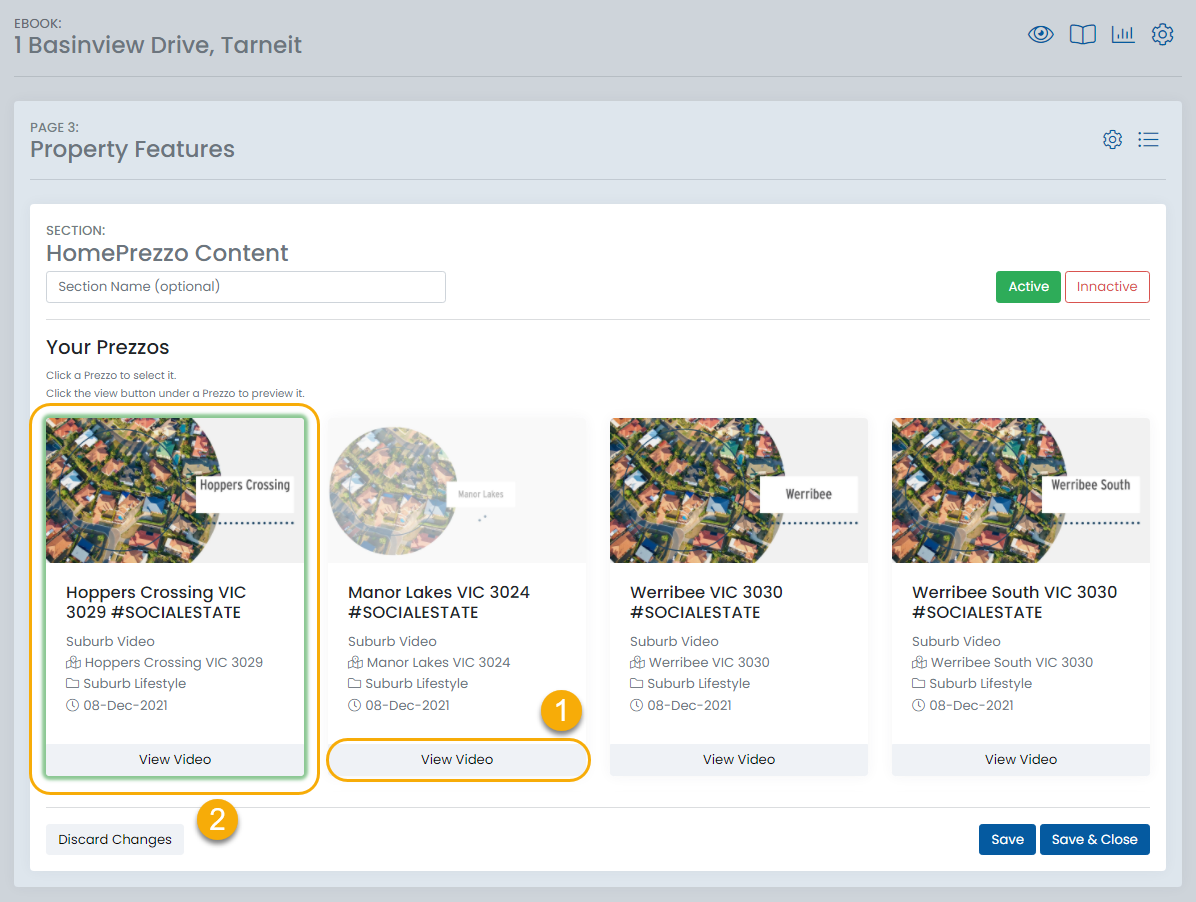
- Preview content using the View Video button
- Select content by clicking on top of the content and it outlines in green to show your selection.
Custom gallery
Create galleries of your own images to place inside of eBooks. When you create a Custom Gallery section, you'll have the choice between using one of your existing photo galleries or creating a new one:
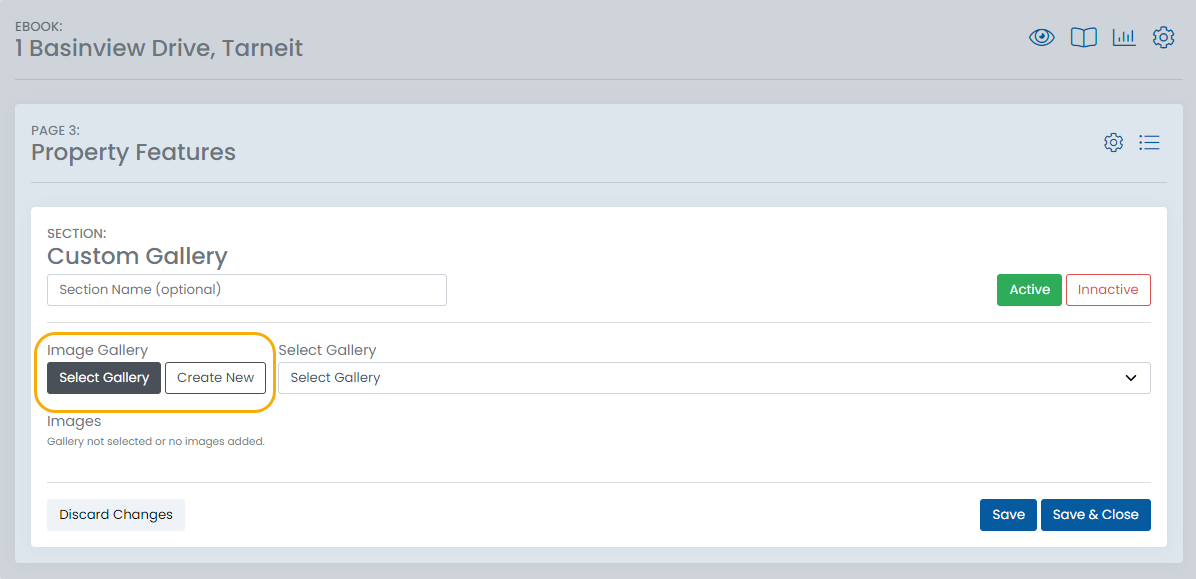
If using an existing photo gallery, select the gallery from the Select Gallery dropdown list.
If creating a new photo gallery, you'll choose a name for your gallery before being taken to the gallery creation page.
Staff list
The staff list section allows you to include details about your staff/agents in your eBooks. When creating a staff list section:
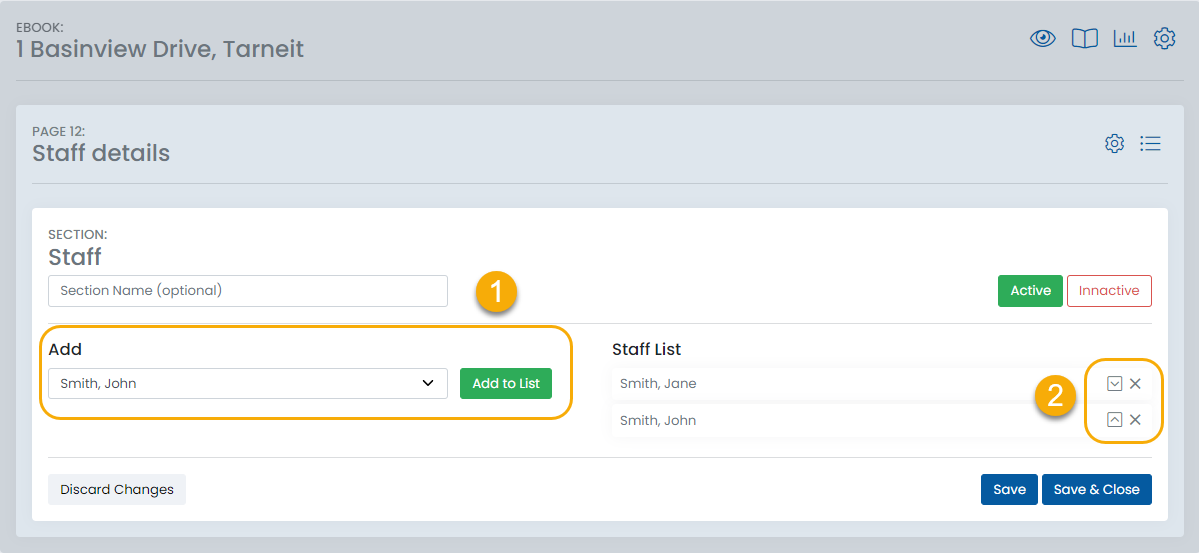
- Add staff members to the list by searching for them in the dropdown menu and clicking Add to List
- Rearrange your staff list by moving staff members using the up/down arrows beside their names. Delete staff from the staff list by clicking the X beside their name
Design tips
eBooks are a tool that allows you to create beautiful documents for nearly any office marketing purpose you can think of, though just like with any tool, the better you understand it and know how to use it the better the end results will be!
Here we present a few tips on organising and laying out your content and some advice on eBook best practices. Of course you're free to create your eBooks however you wish and let your creativity run wild, though by following some of these tips you'll ensure that your eBooks stay readable, visually pleasing and professional looking.
Break it up
The saying "less is more" is especially true of visual content. When you add more and more content to an eBook your objective is to present the necessary information to the reader and for them to be able to quickly and effectively access it. The temptation here can be to condense that information into the smallest space possible in the hope that the reader will quickly be able to find what they're after, though in practice this just ends up frustrating the reader as different subjects and pieces of information can be lost in long, dense passages of content. The opposite scenario where things are spread out so much that the pages look sparsely populated and boring is equally undesirable, so our aim should be to space the content out enough that it's easy to locate individual pieces of information but not so much that our eBook looks like the work of a lazy high schooler trying to make the minimum page count on an essay.
When things are separated enough, it's obvious to the reader where one subject/section ends and the next begins and the space around the sections is visually pleasing and logical. Let's look at a couple of examples to get an idea of the difference between content that isn't spaced or broken up adequately and content that has adequate spacing.
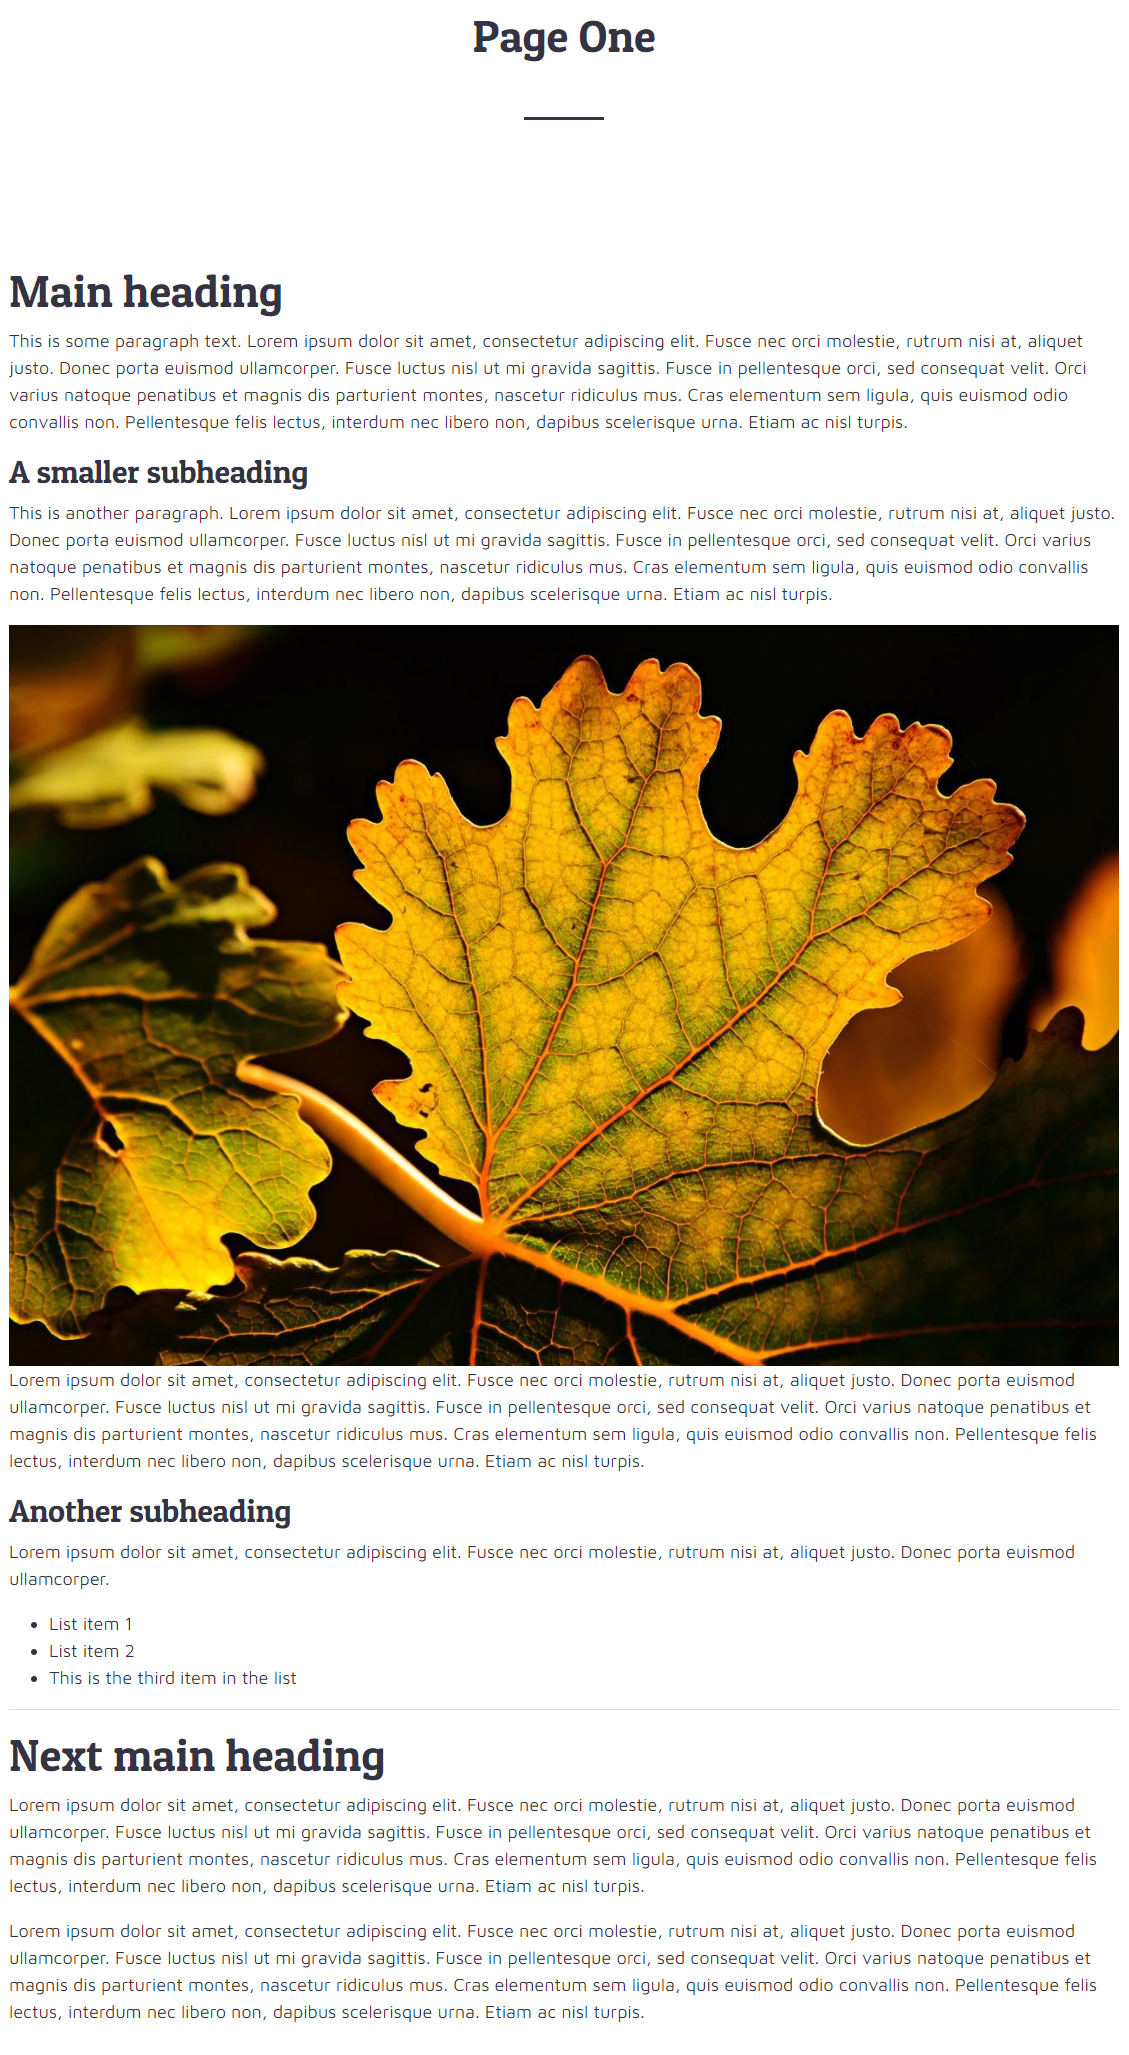
Example 1 - no spacing
In this example we haven't done anything to separate the content. Everything sits directly on top of each other with no clear sections or way to navigate the content. From a reader's perspective it's bland and difficult to read.
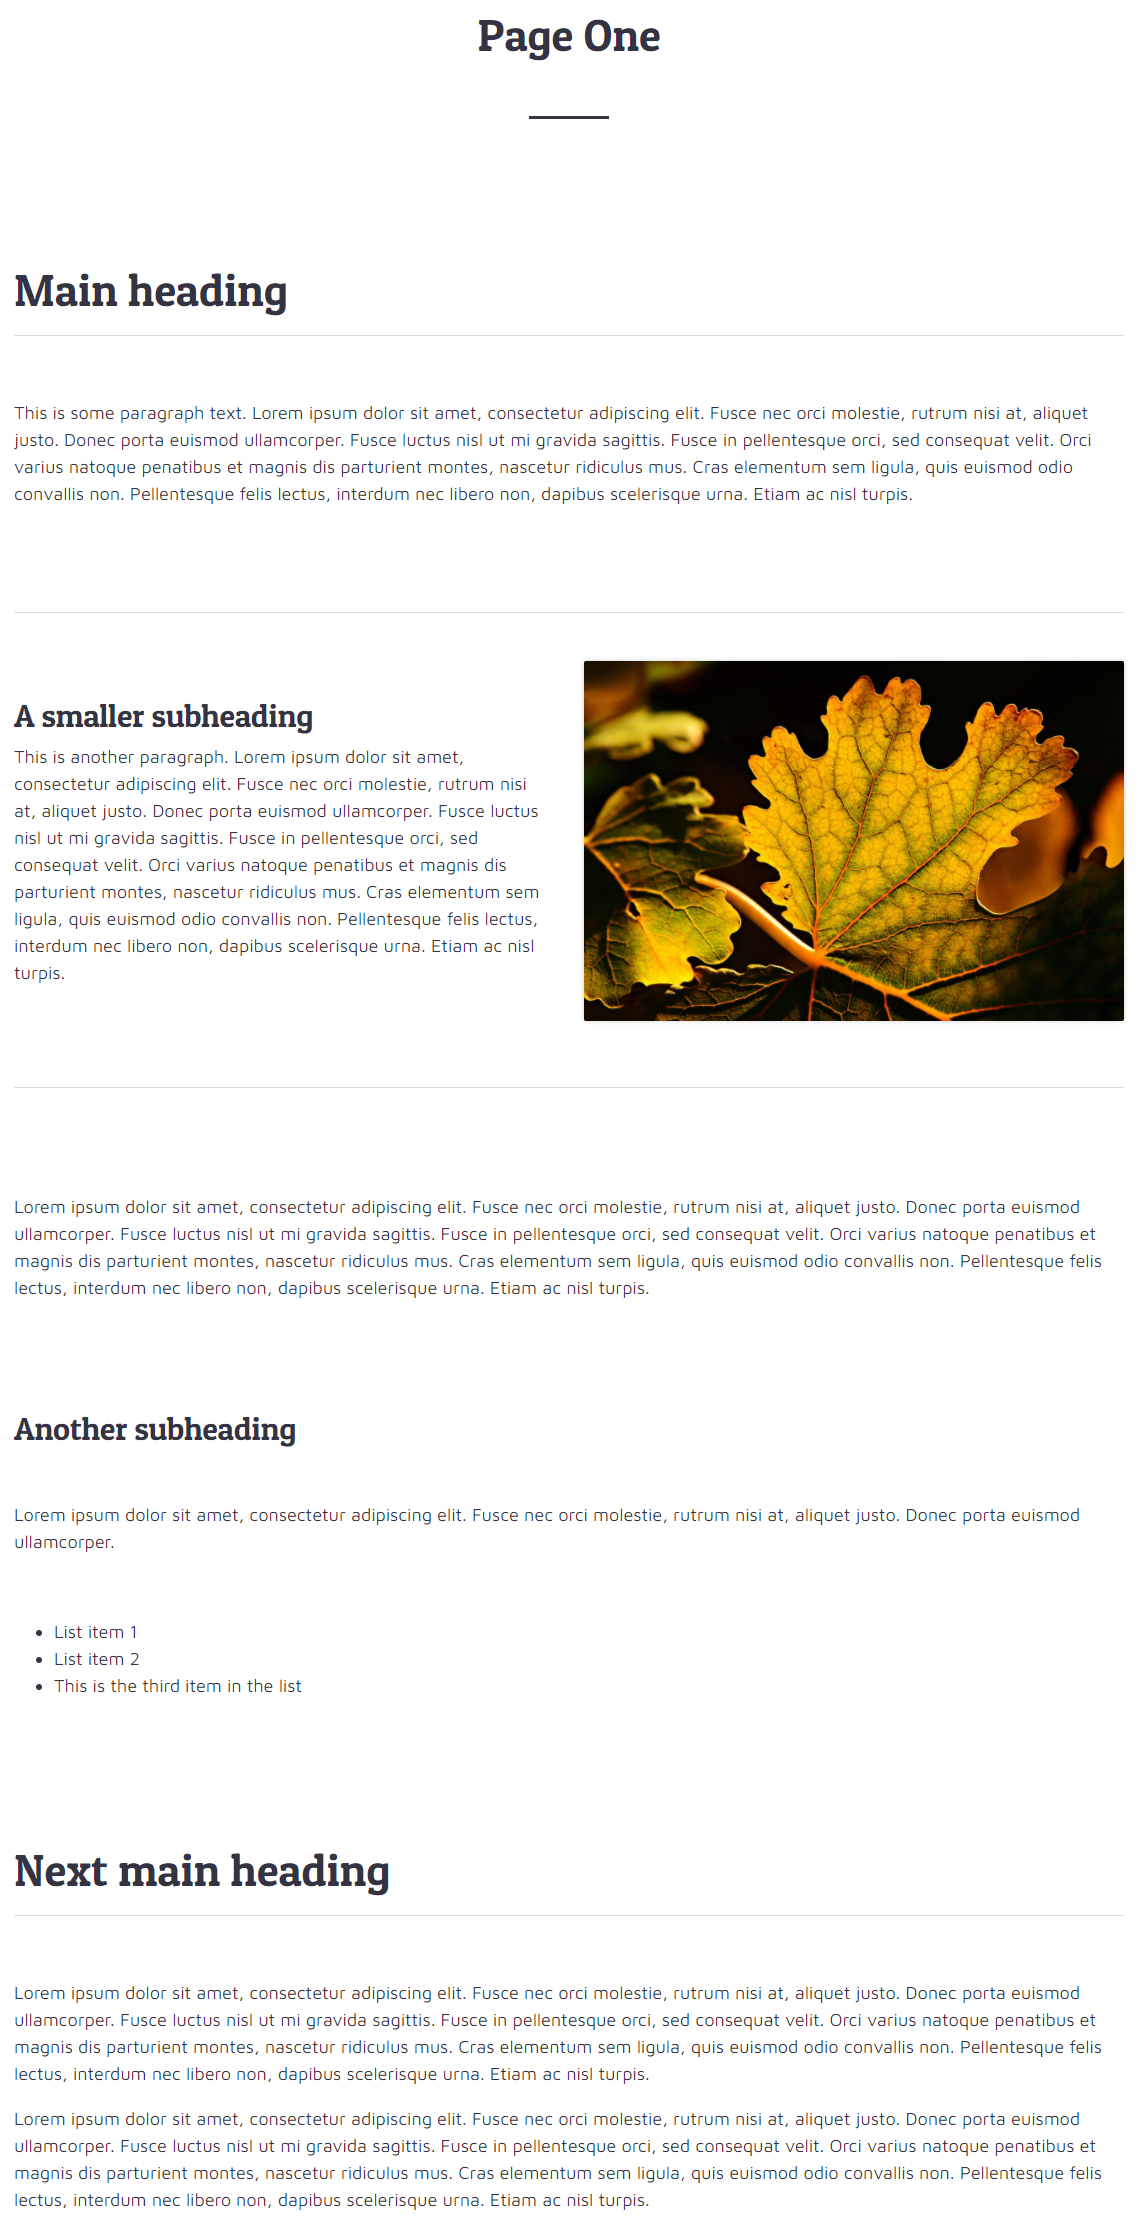
Example 2 - spacing, different section types and dividers
In this example we've taken the same content from the example above but have added some spacing, dividers, and have broken up some of the content into different section types to make it look more interesting. From a reader's perspective it's much easier to find what I'm looking for, and the layout is much more interesting and visually pleasing.
Be sure to utilise methods of separating your content in your eBooks to make it easier for the reader to find your content and to improve the look of your eBooks.
- Spacing - add a few empty lines between paragraphs/headings/sections/images in the text editor when adding content to sections to separate content from each other.
- Dividers - use dividers to signify that one section has ended and the next has begun. Read more about dividers and adding horizontal lines in the text editor.
- Different section types - use different section types to layout your content in interesting and meaningful ways. Explore text/image sections, responsive columns sections and panels sections to learn more about the different ways to add content.
Consistency & simplicity
Our brains quickly identify patterns and attribute meaning to things we see. When you look at the heading above this paragraph (Consistency & simplicity), it's clear to you that it's a subheading and is telling you that this is a new section on the same page, but when you look at the page heading at the top of this eBook page (Design tips), it's clear to you that that is a page title and is telling you that you've just scrolled onto a new page.
The reason your brain does this smoothly and easily is that the titles and headings in this eBook have a simple, consistent format - all page titles are simplistic and have the same font, weight and size, and the subheadings are all very similar too.
By keeping the formatting of page elements like headings, dividers etc. simple and consistent, then readers will naturally understand the structure of your document much more easily and will have an easier time finding content in the eBook. Let's look at an obvious example:
Example 1 - lack of consistency
In this example, the meaning or importance of each of the headings is unclear due to the inconcistent way in which the headings are formatted. The heading at the top is our primary heading, but we wouldn't guess that based on it's font size relative to some of the other subheadings. It's also not clear that the subheadings have equal importance as they have wildly different formats. The relatively small amount of paragraph text between each heading definitely exaggerates the inconsistency in this example, though even in longer documents inconsistent formatting can confuse the reader.

Example 2 - consistent formatting
In this example the main heading has been given a much larger font size and a horizontal line beneath it to signify that it is THE main heading for this section. The subtitles have been simplified by removing their formatting (boldness, italic, underline etc.) and have all been made the same size. There is also consistent spacing between the headings and the following text, making the subheadings identical and making it more obvious that they are serving the same purpose (a section subheading).

Templates
What are templates?
eBook templates allow you to quickly recreate previously made eBooks without having to create them again from scratch.
With eBook templates, you can create your perfect eBook once, copy it to a library of templates and create future eBooks based off of the original with just a few mouse clicks. What's more, for eBook templates that contain automatically filled property sections (Property Details, Galleries etc.), when creating a new eBook from the template, simply changing which property in your listings database the new eBook is linked to will automatically swap out the property details for the correct property.
Edit multiple eBooks at once
Perhaps you've created a page in an eBook template that includes information about your office including your address. After a while, this page might come to exist on 100s of eBooks. What happens if your office moves and you want to update the address that's shown in this section of all your eBooks? If you'd created all the eBooks individually, you'd have to manually go through each eBook and find the address to change. This would be very time consuming! Fortunately templates eliminate this problem due to something called locked content.
Locked content
When you create an eBook from a template, each page in the created eBook is said to be locked to the template. This means that any changes you make to the eBook template will also affect the eBooks that you have created from it. In the above example, if all your eBooks had been made from a template, all you would need to do is edit your office address in the eBook template and all of the eBooks that had been made with it would also be updated. You can unlock pages in the created eBooks to edit their individual contents, though this will unlock this eBook page from the template, meaning this page in particular would not be updated should the template be updated.
Creating a template
Method One - creating template from scratch
This first method involves creating a new blank eBook template then adding pages to it as you would for a standard eBook.
Step One
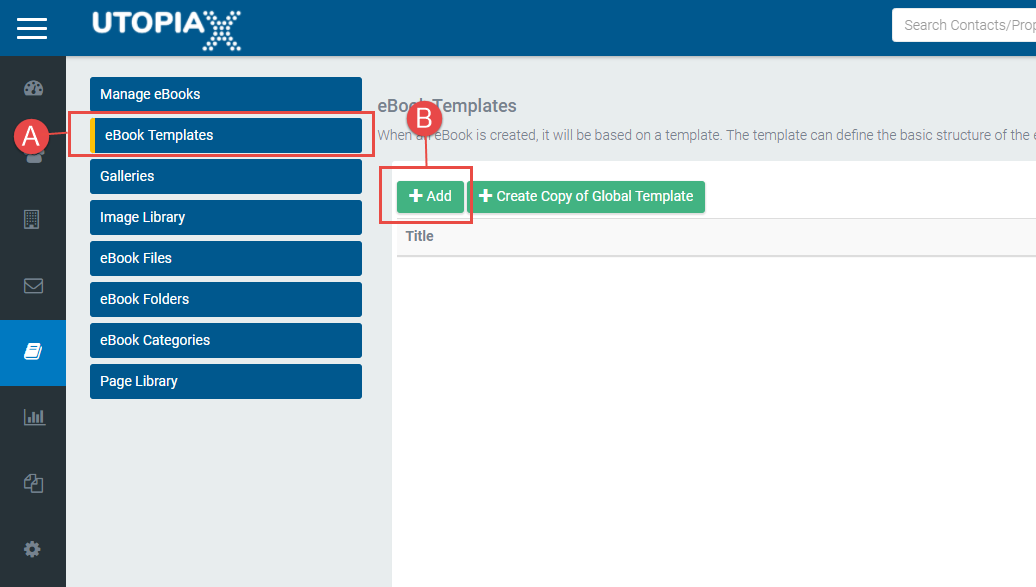
Click eBook Templates from the left-hand side eBook menu (A), then on the next page click the Add button (B).
Step Two
On the next page, give your template a name and adjust any other settings as required. These settings are virtually the same as the settings displayed when creating a new eBook, see the eBooks settings section for more information on these settings. When you've finished naming and configuring your eBook template, click Save at the bottom of the screen.
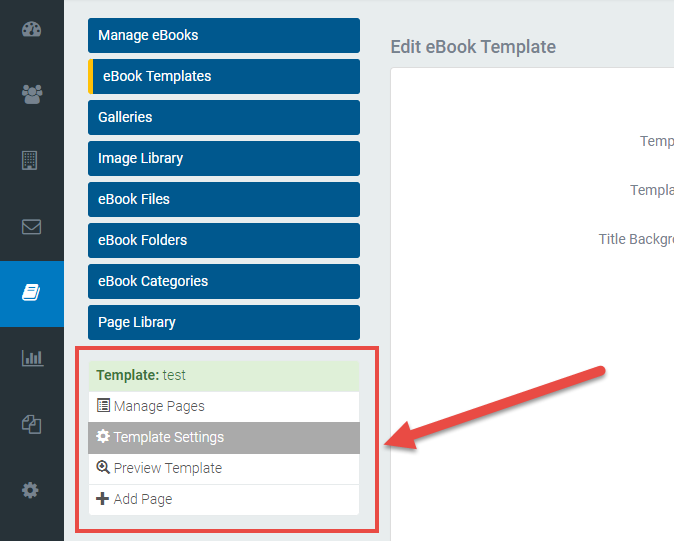
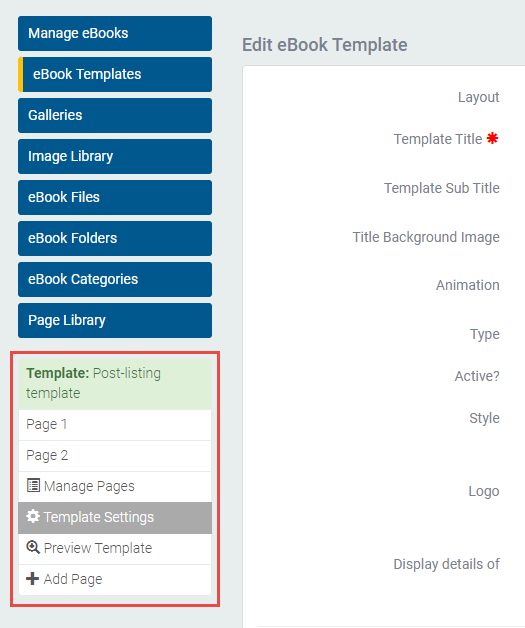
Step Three
Once you've clicked Save on the eBook template settings page, the eBook editing menu should appear on the left-hand side of screen beneath the eBook module navigation menu where you can begin creating your template. Clicking on Manage Pages will take you to the same familiar eBook interface where you can add and edit pages.
Method Two - convert an existing eBook to a template
This next method of creating an eBook template is for situations where you've already created the eBook that you wish to use as a template in your library.
Note: this method involves converting an existing eBook into a template and will destroy the original eBook in the process. If you want to preserve the original eBook, follow the optional first step below of first creating a copy of your eBook to convert to a template. Otherwise, begin from Step Two.
Step One
(optional)
Create a copy of the eBook you wish to convert to a template. When you convert the eBook to a template, the original eBook will be destroyed. Following this step will ensure that a copy of the original eBook will remain in your library.
Step Two
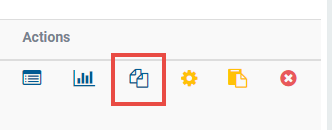
Click the convert to template button beside the eBook you wish to convert to a template.
Step Three
You'll be taken to the template settings page, shown in method one above. Again, refer to eBook settings for more information on these settings. Once you're happy, click Save & Close at the bottom of the screen and your eBook is now in your template library.

Creating eBooks from a template
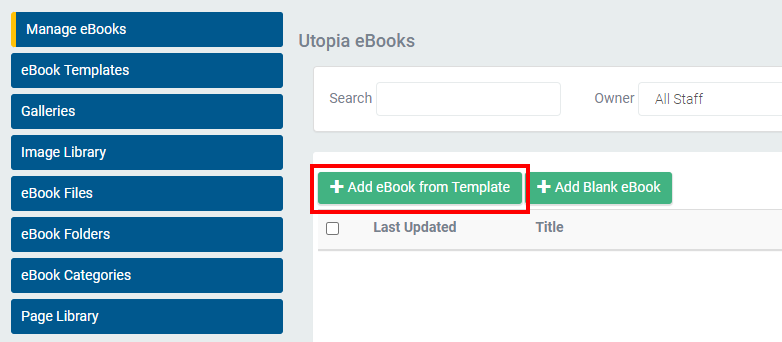
To create an eBook based on a template, from the eBook module homepage, click the Add eBook from Template button.
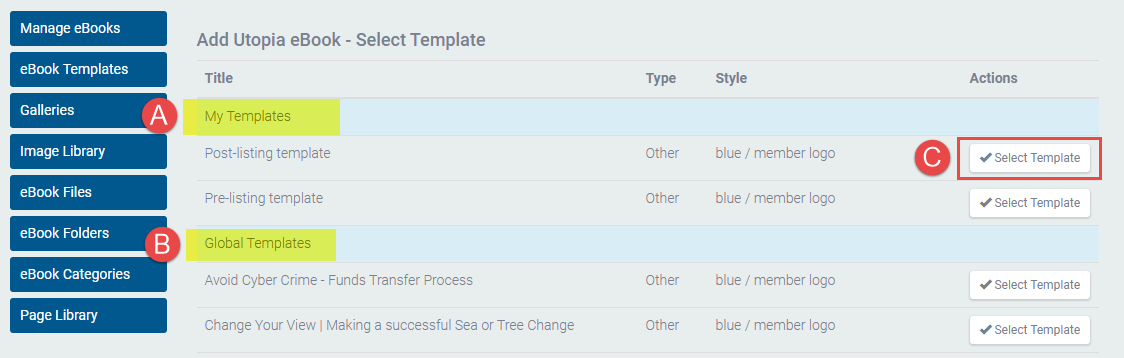
On the following page you'll be shown a list of:
- Your office templates that you've created (A), and
- A list of all global eBook templates (B) - these are templates released by Head Office that you're able to use should you wish to.
Click the Select button (C) beside the template you wish to use to be taken to the settings page for your newly created eBook where you'll set an eBook title, a viewing password (if required) as well as choose a property for the eBook to be linked to (if required).
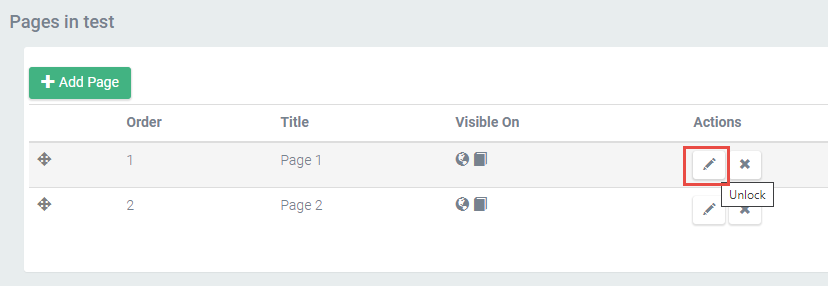
A note on locked content
One of the wonderful things about eBook templates is how you can update content in several eBooks you've created with the same template by only having to edit the information in a single location (the template). When you create an eBook from a template, each page in the created eBook is said to be locked to the page in the template, meaning any changes made to a page in the template will be applied to that page in any eBooks that have been created with the template. You can tell if an eBook page is locked to a template if only two buttons are present under the Actions menu for that page, and hovering your mouse over the edit button shows the text "Unlock". If you unlock this page, then changes to this page in the eBook template will no longer be applied to this page in this particular eBook.
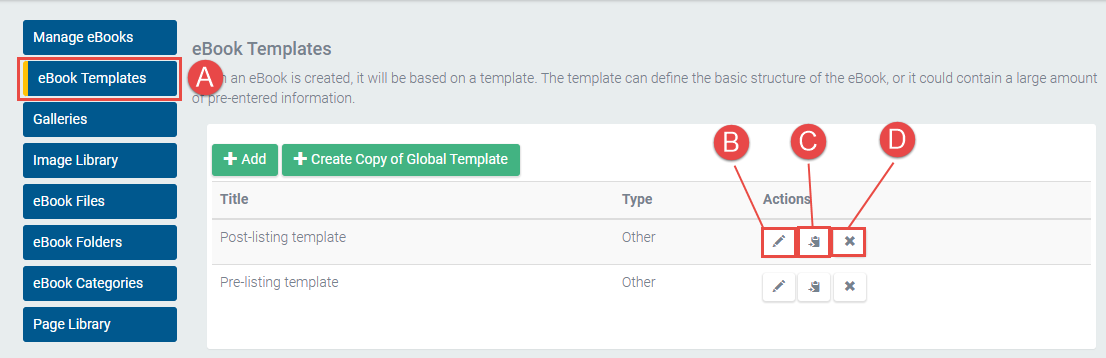
To view your office eBook templates, navigate to eBook templates via the left-hand menu (A). You can edit templates (B), create a copy of a template (C) or delete a template (D).
Editing a template
Clicking the edit button beside a template in your library (shown above) will take you to the settings page for that eBook template. Make changes to the contents of the eBook template via the eBook management menu on the left-hand side.
Page templates
Much like you can store entire eBooks as templates for creating new ones, so too you can save pages you've created in a page library that you can add to future eBooks.
Adding a page to your page library
Method one - adding a page from scratch
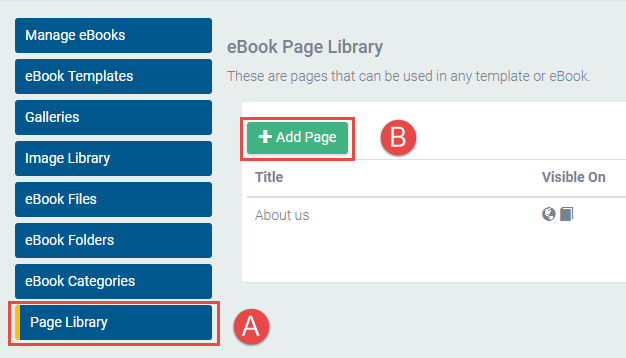
Navigate to your page library (A) and select Add Page (B).
On the following page you'll be required to name the page and adjust any of the page settings. See the page settings section for more information on these settings.
Once you've done this you'll add content to your new page template in much the same way you would add content to a page in an eBook.
Method Two - copy eBook page to page library
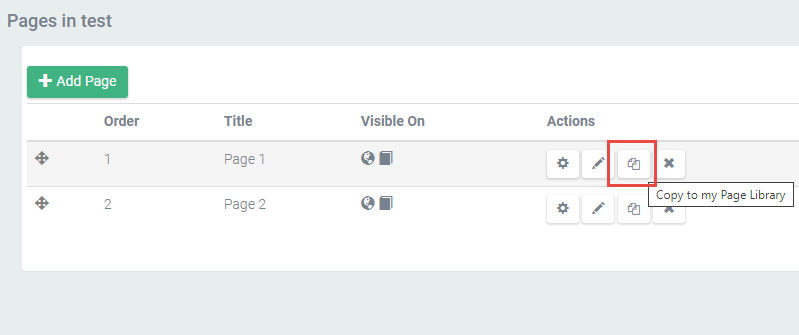
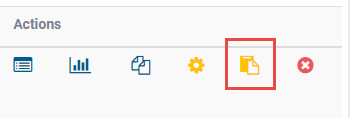
You can also copy a page created in an eBook to your Page Library.
To do this, click the Copy to my Page Library button beside the page title in the eBook. The page will be copied to your page library with the same title as the page in the eBook.
Adding a page from your page library
To add a page from your page library to an eBook, after clicking the Add page button from within your eBook, select the Add Page/s from Library tab (A) on the following screen. Under this tab you'll see your office's page templates that you've created (B) as well as other global page templates that have been released by Head Office (C).
